Oyster mushrooms are one of those mushrooms that can not only be found in the forest, but also grown with your own hands in the country house, in the garden, in an old greenhouse or in a cellar. The main feature of oyster mushrooms is that for the full development of fruiting bodies they need a special substrate. In addition, for cultivation you will need a special mycelium, which contains fungal spores, from which fruiting bodies will subsequently begin to form.
In fact, growing oyster mushrooms in bags at home is not particularly difficult if you strictly follow the technology. To do this, you will find this article useful, which details the main stages of cultivating these mushrooms at home.
Specifics of oyster mushrooms
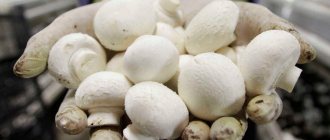
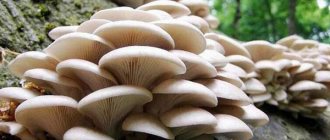
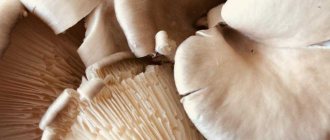
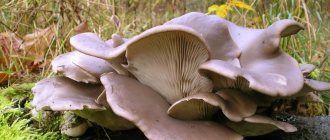
Oyster mushrooms are healthy and tasty mushrooms. They can grow both in natural and home conditions. The peculiarity of mushrooms is in their structure. The solid cap, slightly tapering towards the edge, smoothly transitions into the stem, which is most often located at the edge of the mushroom. Oyster mushrooms come in different colors: gray, lemon yellow and ash purple. It all depends on the type of mushroom. A good young mushroom has elastic, juicy pulp. Over time, it becomes dry and hard.
Oyster mushrooms contain fiber, which normalizes microflora and helps eliminate toxic substances. Also, many people eat this type of mushroom to boost immunity and get rid of extra pounds.
Oyster mushrooms can be grown in different ways. Some people use the extensive route, when mushrooms grow in open ground. Myceliums are installed in the garden in the shade. This option is limited by seasonality.
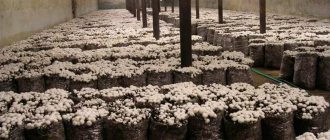
There is also an intensive way to grow oyster mushrooms. A specially equipped room is used for this. So, mushroom cultivation can be done all year round.
Oyster mushrooms: growing at home on cardboard: technology, equipment
Unpretentious oyster mushroom can be grown even on paper. It’s hard to believe, but such a substrate is often used by amateur mushroom growers.
In general, there is nothing surprising in this: after all, paper is made from cellulose (wood material). For growing oyster mushrooms, it is preferable to use packaging cardboard:
- there is practically no printing ink on it
- it is accessible since packaging is often thrown away
- cardboard can be produced from several types of trees, which increases its nutritional value as a substrate
- porous structure ensures good breathability
Oyster mushrooms on cardboard
The technology is absolutely not complicated and consists of the following stages:
- rinse the cardboard under running water
- fill with hot water (60 degrees)
- leave for 7 hours, periodically adding hot water
- let cool to 25°C
- squeeze and straighten
- leave it unfolded for a while
- fold in a stack
- place between sheets add mycelium
- make holes
- put it in a bag and tie it
- keep in a dark place at 15-20°C
- After a couple of days, untie and drain excess water, if any.
- after 4 weeks, untie the bag and expose it to dim light
Of course, this method is absolutely not suitable for running a mushroom business.
In addition to studying technology and purchasing equipment, you also need to become familiar with other equally important aspects that will help you get a good harvest. You can read about temperature, ways to increase productivity and other useful information here. And for novice businessmen who are going to seriously engage in growing oyster mushrooms, this article will be useful.
Oyster mushrooms in bags - where to start?
This method is one of the most common and convenient. You don't need special equipment or a lot of money. All that is needed is a special room, bags, substrate and mycelium.
Room
Choosing a place to grow mushrooms is one of the key points. A barn, garage or cellar is suitable as a room.
Ideally, you will need two rooms. In one, incubation will take place, and in the second, mushrooms will be grown directly.
Remember, the room must be disinfected before starting work. Whiten the walls with a solution of copper sulfate. Be sure to cover the ventilation holes with mesh so that midges cannot enter the room.
The key to success is favorable conditions inside. Moreover, at each stage they are different. The temperature level during incubation is 25 degrees, humidity is 70%. After incubation, keep the temperature to 18 degrees and humidity from 80% to 95%.
Oyster mushrooms: growing at home in a greenhouse: technology, equipment
Having a greenhouse on your site, you can grow oyster mushrooms in it. The structure can be made of any material (glass, film). The main thing is to create the desired microclimate.
Greenhouse requirements:
- dim lighting - to do this, cover the walls with a special mesh or paint the greenhouse material with a chalk solution.
- possibility of changing temperature - each period of fungal development requires a certain temperature regime. The greenhouse should not heat above 25°C.
- ensuring high humidity - for this, purchase a sprinkler or install hoses.
- good ventilation - air flows should freely penetrate into the greenhouse when it is ventilated.
Hanger hangers from the greenhouse
You can grow oyster mushrooms in this building in different ways:
- extensive, when fruiting occurs after 3-4 months (stumps and logs are used)
- intensive, with the maintenance of a special microclimate, in which fruiting occurs in 1.5-2 months
How to care for oyster mushrooms in bags
Growing takes place in two stages. At first, the myceliums are in the incubation period; after white threads of future mushrooms appear, they are moved to another room, where the oyster mushrooms themselves grow until they are fully ripe.
Light
Incubation takes place in a dark room.
In the second phase, mushrooms need light. Set daily lighting to 8-10 hours. Check for diseases. If the mushrooms have thin long legs, then there is not enough light for them, and if the mushrooms are too small and weak, on the contrary, there is too much light.
The incubation period depends on the type of fungus. As a rule, it is 10-14 days.
Temperature and humidity
The temperature level during incubation is 25 degrees, humidity is 70%. After incubation, keep the temperature to 18 degrees and humidity from 80% to 95%.
Ventilation
There is no need to ventilate the room during incubation. Use a fan to cool the material. Please note that the bags should not hang too close.
When the mushrooms begin to sprout, take care of ventilation, but do not create drafts.
Watering
When oyster mushrooms are grown in bags, they do not need to be watered with a special growth substrate. The main thing is to maintain an optimal level of humidity. For these purposes, myceliums, walls and floors are irrigated twice a day.
If there is a heater in the room, then there should always be a bowl of water next to it.
Preparation for cultivation
Before you start growing, you need to prepare the room and, if necessary, purchase additional equipment. Be sure to prepare the substrate and mycelium.
Selecting a room
For growing oyster mushrooms in bags, a cellar, basement or hole in the garage is suitable. You must first disinfect the room. To do this, prepare a 4% lime solution, which is used to treat all surfaces. Then the room is closed for a day. After the specified time, it is ventilated until the smell disappears completely.
In its natural environment, oyster mushrooms grow in high humidity. Such places should be well ventilated. At home, mycelium germinates at the following indicators:
- humidity at 70-90%;
- availability of lighting (natural or artificial);
- temperature from +20 to +30 degrees;
- constant supply of fresh air.
Selection of bags
One of the main points when deciding how to grow oyster mushrooms is choosing the appropriate method. At home, bags are used for these purposes.
For these purposes, any plastic bags are used. Their size is selected depending on the size of the crop that needs to be grown and the dimensions of the room.
Advice! It is most convenient to use bags measuring 40x60 cm or 50x100 cm.
The bags must be durable, especially if they are hung indoors. How many bags are needed depends on the volume of plantings. The minimum capacity of bags should be 5 kg.
Seed material
Mycelium for producing oyster mushrooms can be purchased at specialized enterprises that grow these mushrooms. In industrial conditions, the period of use of seed material is no more than a year.
Therefore, the mycelium is sold at retail at low prices, although it still retains the ability to bear fruit. For beginners, this is a great opportunity to try their hand at growing oyster mushrooms.
At the initial stage, it is not recommended to purchase too much oyster mushroom mycelium. Before planting, it must be stored in the refrigerator so that it does not spoil. The purchased mycelium is yellow or orange in color.
Immediately before planting, the mycelium is left for a day at room temperature. Then the planting material is carefully crushed after opening the bag and transferred for a short time to the room where it is planned to grow mushrooms. This will allow the mycelium to adapt to changing conditions.
The package is opened in a clean room using gloves. It is recommended to plant and germinate oyster mushrooms in different rooms to avoid mycelium infection.
High-quality oyster mushroom mycelium is obtained in the laboratory, but it can be grown independently. To do this, take the upper part of the fruiting body of the mushroom, which is treated with hydrogen peroxide. A portion of the mushroom is then placed in a test tube placed over a flame. It is first filled with a nutrient mixture.
The containers with oyster mushrooms are closed and placed in a dark room where the temperature is maintained at 24 degrees. After two weeks, the mycelium is ready for planting.
Substrate preparation
To grow oyster mushrooms, you need a substrate, the functions of which are performed by sunflower husks, sawdust, corn cobs, and cereal straw. These mushrooms grow well on sawdust of deciduous wood.
The mixture is preliminarily processed as follows:
- The material is poured with warm water (temperature 25 degrees) for 20 minutes and stirred periodically.
- The water is drained, the mixture is squeezed out, and the container is filled with hot water (temperature 70 degrees). A pressure is placed on top of the material.
- After 5 hours, the water is drained and the substrate is squeezed out.
- To improve the nutritional properties of the material, you need to add mineral components: 0.5% each of urea and superphosphate and 2% of crushed limestone and gypsum.
- The substrate humidity should remain at 75%.
Another way to process the substrate for oyster mushrooms is to boil it. To do this, place it in a metal container, add water and boil for 2 hours.
It is allowed to use a mixture of the specified components. When growing mushrooms on sawdust, the content of other substances is no more than 3% of the total mass of the substrate.
If preparing the substrate yourself causes difficulties, you can purchase it ready-made. The main requirement for materials is the absence of mold. When purchasing, you need to pay attention to its composition. Usually the packaging indicates which mushrooms it can be used for. Ready-made substrates for oyster mushrooms, champignons, honey mushrooms and other mushrooms can vary significantly.
Equipment purchase
To obtain stable yields, you need to equip a room for growing oyster mushrooms. If mushrooms are sold, then purchasing equipment will be an important investment in your future business.
To maintain the temperature, you need to purchase a heater. Cold rooms will require additional thermal insulation. Walls and floors are subject to insulation. You need to control the temperature using a thermometer.
Oyster mushrooms do not like direct sunlight, but to arrange lighting you need to purchase daylight devices. Spraying of plantings is carried out with a conventional spray bottle. To maintain the required microclimate, fog generation units are used.
Supply and exhaust ventilation will help ensure the flow of fresh air. In a small room, a household fan can accomplish this task.
Harvesting
The appearance of the mushrooms indicates that the harvest is ripe. They become large - the width of the cap is approximately 13 cm, and the height of the mushroom is 10 cm. It is important to prevent the mushroom from overgrowing. Overripe, it becomes tasteless and tough.
Oyster mushrooms grow in clusters. The entire splice should be cut off. Mushrooms left behind will interfere with the growth of others. To do this, use a sharp knife with a thin blade.
Note that the first wave of the harvest is the most fruitful. Subsequently, the mushrooms grow faster, but in smaller quantities.
How to store ripe mushrooms
Once the crop is harvested, it is important to store it properly. Use special plastic containers. In one - no more than 1 kg. mushrooms
Shelf life is determined by temperature. So, at room temperature, oyster mushrooms will remain fresh only for a day. Mushrooms can be stored in the refrigerator for 4 days. At a temperature of -2 degrees, the shelf life will be 20 days, and freezing will ensure the freshness of the product for 6 months.
Do not moisten mushrooms before storing. Otherwise, they absorb water and lose their shape.
We talked in more detail about storing oyster mushrooms here.
Difficulties in growing
Inexperienced farmers often encounter difficulties when growing oyster mushrooms. Even if everything was clear in theory, in fact a beginner may encounter various problems. Sometimes plantations are affected by mold, fungus or fruit flies. The reason may lie in one infected block or non-compliance with the humidity regime.
If the bag is contaminated, it should be thrown away and the room disinfected to prevent the situation from happening again. Remove all unnecessary materials with a household vacuum cleaner. Then proceed to treat the room with formaldehyde. To do this, place open jars of solution indoors for several days. Then ventilate it well. Then proceed to formaldehyde treatment.
If midges appear in the mycelium, the bags are also removed, and the room is treated with a sulfur smoke bomb.
It happens when the mycelium does not bear fruit, but there are no external factors indicating a problem. Then, most likely, the reason lies in poor-quality planting material.
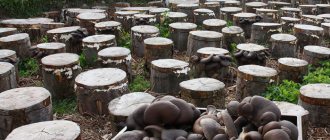
Features of growing on stumps
Oyster mushrooms are grown on trees. With such cultivation, obtaining fruiting bodies takes much longer. By placing the stumps of poplar, maple, willow, birch, hornbeam, beech and fruit trees in the garden plot, you can cultivate mushrooms in a natural environment. Take “fresh” logs, apparently healthy, with bark, 30-50 centimeters in diameter and up to 50 centimeters in height.
Growing on stumps involves preparing the wood, populating it with mycelium, sheltering it from direct scorching sunlight, and maintaining sufficient humidity. Freshly cut logs contain enough moisture. Dry - pre-soaked in water for several days. Stationary - make a fresh cut, water generously.
With the onset of persistent warm weather in April-May, when it is already safe to plant mycelium, incubation of future myceliums begins.
There are several ways to place mushroom mycelium:
- Small holes are drilled in the stumps, 6-8 cm deep, the mycelium is filled in, and the hole is closed with a wooden plug.
- A small cut is made at a stationary stump - 4-5 cm. The surface of the stump is thickly sprinkled with mycelium, a sawn disk is placed on top, and nailed down.
- Dig a shallow trench in a shady place out of direct sunlight. Boiled pearl barley or boiled millet is poured onto the bottom, then mushroom mycelium is placed in a thick layer. Stumps are placed on the mycelium, at a distance of 30-40 cm, and pressed down. The trench is covered with garden soil.
Don’t forget to water your home mushroom meadow regularly; by autumn you will get your first harvest. You plant the mycelium once, and you will collect oyster mushrooms for 3-4 seasons.
Growing a mushroom on a stump is a great way to get rid of a stump after cutting down a tree. The mycelium has conditions for development - growth occurs at a temperature of 10 ° C, although the optimal value is 20-25 ° C.
We grow mycelium ourselves
Self-production of mycelium is a labor-intensive process that requires experience. The easiest way is to breed mycelium on cereal crops. Crush the grains and boil for 15 minutes. Pre-treat all containers you work with with alcohol.
Please note that all work with mushrooms must be carried out wearing a mask and gloves.
Conventionally, the mycelium production process can be divided into several stages:
- Production of royal mycelium. It is made in a test tube with crushed grains and pieces of mushroom. First, parts of the oyster mushroom are dipped in hydrogen peroxide, then added to the nutrient medium and tightly closed. After two weeks, a white edge appears, which is the uterine mycelium.
- Creation of an intermediate mycelium. Chalk and gypsum are added to the grains. The mixture is placed in jars along with the mother liquor. The containers are tightly closed with a lid and left for two weeks. During this period, a fresh edge appears.
- Preparation of seed material. First, the substrate is sterilized and placed in clean containers. Intermediate mycelium is also added here. Next, you need to wait until it is completely overgrown with white edges. The process is complete.
Please note that mycelium germinates at all stages, but only following the technology will give good results.
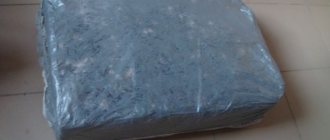
Getting Mushroom Blocks
Oyster mushrooms are grown at home in the form of mushroom blocks resembling beds. Their composition includes a prepared substrate, which is placed in bags in layers.
For every 5 cm of material you need to plant 50 mm of mycelium. In this case, the bottom and top layers should remain the substrate. The materials are laid tightly, but without compaction. The bag should be filled to 2/3 of the total volume.
The bags are tightly tied, after which small holes are made in them through which the mycelium will grow. The size of the holes is no more than 2 cm, and they are placed every 10 cm in a checkerboard pattern or in a random manner.
Then the prepared containers are placed for two weeks in a dark place where a constant temperature is maintained (from +19 to +23 degrees). Bags of oyster mushrooms can be hung or stacked on top of each other in several rows.
During the incubation period, ventilation of the room is not required. The carbon dioxide content increases humidity, which allows the mycelium to develop faster. Within 10 days, active growth of oyster mushrooms occurs, the mycelium becomes white, and a distinct mushroom smell appears.
After 20-25 days, the room with oyster mushrooms is ventilated or moved to another room. In the future, plantings require lighting for 8 hours a day.
conclusions
- Growing oyster mushrooms in bags at home is one of the most common methods of growing this type of mushroom. It doesn't require much time or effort. The main thing is to follow the exact instructions.
- The basic rule is to work with clean hands in a disinfected room and maintain optimal temperature and humidity levels.
- Use two rooms to grow oyster mushrooms. In one, the mushrooms go through an incubation period, and in the second, the mushrooms grow.
- If the mycelium is affected by mold, midges or fungus, throw away the bags and thoroughly disinfect the room.
- You can buy mycelium for oyster mushrooms, or you can make it yourself. In the second case, if everything is done correctly, you will have a cheap, high-quality mixture.
Oyster mushrooms: growing at home in sawdust: technology, equipment
Sawdust is good as a substrate because it has the ability to retain moisture within itself for a long time. However, the harvest from sawdust will be less than from a stump.
Oyster mushrooms in sawdust
Adhere to the basic technology requirements:
- For growing oyster mushrooms, choose sawdust from deciduous trees (beech, poplar, aspen, chestnut, hornbeam, birch). Conifers emit resins that have a negative effect on mushrooms.
- It is advisable to buy raw materials fresh
- if it is not possible to quickly use the purchased sawdust, store it in a dried form to avoid the appearance of mold
- grind the raw material to 4 mm
- boil for 2 hours (take 3 parts water for 1 part sawdust)
- after cooling to 25°C, you can add nutrients (for example, beer wort, oat bran)
- drain the water by placing the sawdust in the mesh
- sowing is carried out 14 hours after the water has drained
- use grain mycelium, as it survives better on this raw material
- It is preferable to use bags or wooden boxes as containers
- place in any suitable room (basement, greenhouse, garage)