The benefits of growing mycelium yourself
There are a number of advantages to growing mushroom planting material yourself:
- high quality . If you decide to make oyster mushroom mycelium at home, this will allow you to discard the damaged parts. There will also be confidence that the seed is stored in proper conditions, which will significantly improve its quality;
- saving . If you prepare planting material at home, its cost will be several times lower compared to similar products in specialized stores;
- safety . As you know, mushrooms absorb all negative substances from the soil and air. If you prepare mushroom planting material at home, you can protect yourself by consuming ripe fruiting bodies.
Important! The only disadvantage of home growing is the slow growth rate. This is due to the fact that factories use an autoclave, which speeds up development.
Preparing the growing site
To grow high-quality and productive oyster mushroom mycelium, it is necessary to properly prepare the growing site.
Most often, mushroom growing enthusiasts use several methods for creating planting material:
- on cardboard;
- in grain.
On cardboard
This method is considered simpler and cleaner. Its main advantages include:
- Prevention of the development of pathogenic bacteria, since it is impossible for them to develop on paper.
- Accelerated colonization of fungal spores.
- Better air supply to planting material if the farmer uses corrugated cardboard.
- Moisture evaporates more slowly.
- Constant sterilization of the growing area is not required.
- Availability for the consumer. You can buy sheets of cardboard at any office supply store for a low price.
- Large quantities of seed at low cost.
Important! Use clear cardboard. Also, there should be no coloring pigments, drawings or similar things on it, otherwise the quality of the planting material will be minimal.
Step-by-step instructions for growing oyster mushroom mycelium on cardboard are as follows:
- Chop the leaves and pour boiling water over them. Keep them in this state for at least 60 minutes.
- Prepare plastic containers. You can use glasses or cut bottles. Make a small hole in the bottom. After this, pour boiling water over the containers to disinfect.
- Prepare the seed. Most often, elements of the above-ground part of the fungus or parts of the root system are used. Divide the stem and cap into fibers. For these purposes, you need to use a knife or blade, which is first disinfected with alcohol.
- Squeeze out excess moisture from the cardboard and mix it with seed material.
- Place the mixture in the prepared containers and compact it a little. Cover the neck with cling film or a plastic bag.
- Place the containers in a warm place out of direct sunlight.
- Water the seed daily with warm water using a spray bottle.
- Every day, remove the film for 5-10 minutes to allow air to enter.
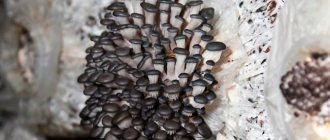
- If all actions are carried out correctly, then after a few months a white fluffy coating will form on the cardboard.
The prepared mycelium is used for cultivating oyster mushrooms at home, as well as for planting a new batch.
Did you know? Oyster mushrooms are an effective remedy against cancer. Regular consumption of these mushrooms blocks cell mutation and prevents tumors from developing.
In grain
This method is used most often by mushroom pickers. To do this, you can use grain from corn or oats. But the most effective way is to propagate oyster mushroom mycelium in rye grains.
Before planting grain and fungal spores, the main component must be prepared. This technology consists of several stages:
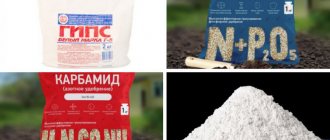
- Boil the grains in clean water (it is best to use filtered water). To do this, soak 30 kg of grain in 30 liters of water. Once the mixture boils, simmer for about 30 minutes. Water that is not absorbed into the grains is drained. The grain must be dried and mixed with 400 g of gypsum and 100 g of chalk. These components are used for better ventilation.
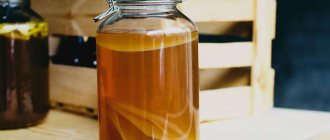
- Pour the prepared grains into glass jars with a volume of 2-3 liters. Cover the neck with a light gauze napkin. Place the jars in a pressure canner or saucepan and place over low heat. Boil the containers for at least 2 hours. When you cook the grains, make sure that no moisture gets inside. Otherwise everything may rot.
- After sterilizing the container, place it in a room that has been disinfected in advance. You need to insist for about 14 hours.
Video: Grain mycelium of oyster mushroom at home
When the preparation is complete, you need to place the crushed fruiting bodies of the mushrooms into the grains. You can use the stick parts of the mushroom (the stem). The spores must first be treated with hydrogen peroxide. Place the jars in a warm, dark place. Make sure that there are no drafts or direct sunlight in this room. If all the technology is performed correctly, then after 2-3 weeks a white coating will appear - oyster mushroom mycelium. It can be used to grow mushrooms in substrate.
Did you know? Oyster mushrooms contain a huge amount of protein (about 3 g per 100 g of product). Due to this, they are compared to dairy products and meat.
Useful tips for mushroom pickers
To successfully grow mycelium and mushroom harvest, the following rules must be observed:
- The ideal substrate is sawdust from deciduous trees.
- The color of the sawdust used should be white or yellow, this will guarantee its freshness.
- The substrate should have a fresh smell, without any rot.
- When transporting mycelium, the required humidity should be maintained within 30-45%. The same conditions must be observed inside the plastic bag in which oyster mushrooms are grown.
- One block bag measuring 35 x 75 cm will require about 300 grams of mycelium; you need to know this in order to accurately calculate the required amount of material. Buying for future use or thawing excess amounts of mycelium is extremely undesirable due to short shelf life and loss of seed quality.
- When producing mycelium and planting it in the substrate, it is necessary to follow strict sanitation rules to avoid infection by pests: containers, tools and hands must be disinfected.
In general, if you follow the rules and technology for growing oyster mushroom mycelium, and then the mushroom itself, you can achieve good results with not a very large investment of money and effort. With careful attention to the process, even a beginner can handle it.
Growing royal mycelium
Uterine mycelium, in other words - spores - is the basis for the development of mycelium. It is produced using a crushed mushroom cap, since it is under it that the spore sac is located. During the preparation process, fresh fruit bodies are used, the surface of which is free of damage and disease.
During the creation of uterine planting material, it is important to ensure sterility. Therefore, it should not be allowed to interact with air. Use only sterile instruments to avoid the development of bacteria.
Aftercare
In the initial period after planting, as noted above, the temperature should be within +18-20 degrees . Then it is reduced to +13-15 degrees , when the first formations of mushrooms are noticeable. By the way, this temperature is optimal for growing all oyster mushrooms.
Don't forget to maintain air humidity. Do not water the substrate under any circumstances, otherwise the mycelium will begin to rot. To achieve optimal humidity, you can hang a wet cloth indoors or leave open containers of water near heating devices (this will allow the moisture to evaporate faster and saturate the air).
Video: Oyster mushroom. Royal mycelium
Step-by-step procedure for growing royal mycelium:
- Cut the fruit body in half and remove a small piece from the bottom of the cap. To do this, it is more effective to use tweezers.
- Treat this area with hydrogen peroxide to kill any bacteria.
- Mix the processed piece with crushed grain and place in a test tube with a closing neck.
- Place the container in a warm and dark place, protected from drafts. You need to wait at least 2 weeks.
After 2-3 weeks, a white coating will appear, with a specific mushroom aroma. This will be the mycelium of the oyster mushroom.
Growing intermediate mycelium
To obtain intermediate planting material for oyster mushrooms, you must follow these instructions:
- Fill the selected grains of one crop with clean water so that it covers them by 3 cm. Cook for half an hour. Do not use several types of grain so that they do not ferment after interaction. Otherwise, the mycelium will disappear.
- Sterilize the jars and fill them with grain mixed with 300 g of calcium carbonate.
- Fill 3/4 of the jar with grain, to which add a finely chopped oyster mushroom cap.
- Keep the containers in a warm place for 3 weeks, after which the mycelium can be used to grow fruiting bodies.
Farmers' recommendations
Before you seriously start breeding oyster mushrooms, you need to familiarize yourself with a few tips from experienced farmers:
- Before you invest money in growing mushrooms, you should try to grow at least one mushroom and look at the photo of growing oyster mushrooms to understand what it looks like;
- cultivation should be done only in rooms where optimal conditions for the growth of oyster mushrooms can be created;
- You should not grow mushrooms on stumps for industrial purposes, as it takes too long;
- for cultivating mushrooms, it is better to use forestry and agricultural waste, which contains many micronutrients;
- to get more yield, mushrooms must be watered daily and maintain high air humidity;
- During planting, you need to use a protective mask and rubber gloves to protect yourself from fungal spores.