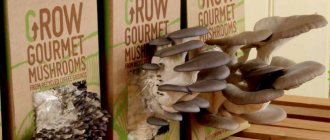
In recent years, more and more Russians have become interested in growing mushrooms at home. There are many substrates for harvesting. But if you are doing this for the first time, then it is best to use straw. This is, in fact, a universal substrate for mushroom mycelium.
With proper management of straw for oyster mushrooms, you can get about three kilograms of tasty and healthy fruiting bodies. We will try to tell you in more detail about how to grow oyster mushrooms on straw.
Why choose oyster mushrooms
Mushrooms grown at home are not only a healthy food product, but also an opportunity to create your own business to make money.
Oyster mushrooms are considered a safe and delicious product that can be consumed even by small children. In China and Japan, scientists studied the fruiting body and proved the usefulness of oyster mushrooms in practice.
What is the role of the mushroom in maintaining health when eaten regularly:
- blood pressure is normalized;
- problems with the nervous system disappear;
- the risk of developing cancer is reduced;
- blood lipid levels return to normal;
- the cardiovascular system is strengthened;
- thanks to the presence of antioxidants, the body ages more slowly;
- oyster mushroom is a sorbent capable of absorbing heavy metals and radionuclides and removing them from the body;
- With constant consumption of this mushroom, cholesterol levels are reduced by up to 30%.
Substrate treatment before planting
Fans of experiments often mix substrate components, developing their own ideal proportion, which allows them to obtain a generous mushroom harvest. But no matter what type of mixture is used, after the purification procedure it needs to be enriched.
- gypsum: 2%;
- superphosphate: 0.5%;
- urea: 0.5%;
- crushed limestone: 2%.
Also, some impurities are added to the main ingredient:
- malt;
- soy flour;
- bran;
- spent grain
Such additives maintain the nitrogen content in the substrate at the required level, which has a good effect on the fruiting of mushrooms.
Often, when growing oyster mushrooms, beginners make a common mistake by incorrectly populating the mycelium in a permanent place. The mycelium is usually stored in the refrigerator at a temperature of 0...+2°C. This is how it retains its vital properties.
If the cooled planting material is not kept at room temperature for several hours before planting in the nutrient mixture, the mycelium will receive a shock, which will negatively affect its vital activity. And the reason for a poor harvest in this case will not be a bad substrate, but a violation of the product’s production technology.
Oyster mushroom is a wonderful product, so why not use the opportunity to grow it in your own country house in the basement. In addition to obtaining a tasty, environmentally friendly harvest, it is also an exciting activity. After all, through the transparent wall of a plastic bag you can observe how a new mushroom develops and grows from a tiny spore.
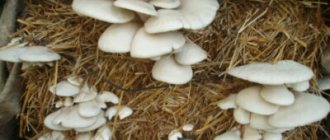
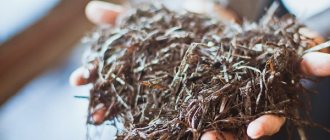
Methods for preparing straw for growing oyster mushrooms
If you decide to grow oyster mushrooms on straw, you need to know the specifics of preparing this substrate. Wheat straw is best.
Pickling
Before sowing the mycelium, the substrate for oyster mushrooms must be soaked, or, as mushroom businessmen say, it must be fermented. The fact is that in an untreated substrate, mycelium can be affected by mold fungi. To prevent this from happening, straw is placed in water for fermentation. This process creates an acidic environment in which pathogens and bacteria cannot exist.
Attention! Oyster mushroom mycelium feels excellent, since it will dominate in the fermented substrate.
Pasteurization process
The straw must be pasteurized to eliminate the presence of harmful bacteria. The process requires a crushed substrate, no more than 10 cm. In small straws, the mycelium quickly forms mycelium and colonies of oyster mushrooms. In addition, it is more convenient to work with such straw.
Soak the straw in water and bring to a boil. Here is how pasteurization of the required substrate takes place:
- Fill a large container halfway with water, boil and cool to 80 degrees. In the future, this temperature should be maintained during the pasteurization stage. Use a thermometer to know the exact temperature.
- We place the straw (as much as will fit in the container) in a net so that it does not scatter in the water, and lower it into the container for 60 minutes. The base for growing oyster mushrooms must be completely covered with water.
- Then remove the mesh to let the water drain and cool to room temperature. After this, the mycelium can be colonized.
Cold incubation method
This substrate preparation is suitable for mushrooms that grow in the cold. This method is also suitable for oyster mushrooms.
So, how is incubation carried out:
- Soak the straw for 60 minutes in cold water, then lay it out to drain, but do not dry it.
- In a large container, mix with mycelium and place in a bag or other convenient container. If the mycelium is pressed, it must be crushed before planting.
- Cover the top with film and put it in a room where the air temperature varies between 1-10 degrees.
- When the straw becomes covered with a white coating, we move the “nurseries” to a warmer room.
Attention! The yield during cold incubation of straw is lower than during pasteurization or fermentation, but there is less hassle with preparation.
Using hydrogen peroxide
Although this is questionable, it is still used to prepare straw for growing oyster mushrooms. Hydrogen peroxide destroys pathogenic microorganisms, but does not harm the mycelium.
Preparation stages:
- the straw is soaked in water for an hour, then washed twice;
- prepare a peroxide solution in a 1:1 ratio and lay in straw: you need to let it stand for several hours;
- then the solution is drained and the future substrate is washed in several waters;
- After this, the mycelium is colonized.
Attention! If you don't want to waste gas or electricity to pasteurize the straw, use hydrogen peroxide.
other methods
In addition to the above methods, you can steam the straw in a water bath or use dry heat.
We hope everything is clear with the water bath. Let's focus on the dry preparation method:
- We set the oven to the minimum temperature, no more than 70-80 degrees.
- Place the straw in a baking bag and leave for one hour.
- After this, we soak the future base for colonizing the mycelium in boiled water. After cooling to room temperature, we populate the oyster mushroom mycelium.
We talked about possible ways to prepare straw for growing oyster mushrooms. Choose the one that best suits your conditions.
Common mistakes
When growing mushrooms, the following mistakes are often made that negatively affect the further development of oyster mushrooms:
- During the first month, air humidity is not measured. Despite the fact that mushrooms will germinate faster in a room with a high concentration of water vapor, it is not recommended to keep bags where this figure is above 75%. A psychometer or hygrometer is used for control.
- Ignorance of the lowest and highest temperatures at which normal mushroom growth on straw ceases. Despite the fact that oyster mushrooms require low temperatures for the development process to begin correctly, it is worth observing the temperature regime established by scientific breeders. The lower limit is + 2°C and the upper limit is + 30°C. If the room temperature goes beyond these marks, then normal development conditions will be disrupted.
What do you need
So, the straw is ready, you can populate it. But before that you need to prepare everything you need for successful work:
- straw;
- mycelium;
- thick polyethylene bags or other containers that have been pre-treated with hydrogen peroxide or alcohol;
- a knitting needle or a sharp stick that is convenient for punching holes;
- an elastic band or string for tying the bag.
We put the mycelium mixed with straw into the prepared container and fill the container, but loosely. Squeeze out the air at the top before tying.
Important! Before sowing the mycelium, hands must be thoroughly washed; the future development of the mushrooms depends on this.
After this, we pierce holes in the bag of straw in increments of 10-12 cm: these are holes for the mushrooms to exit.
Useful tips
In order for the mushrooms to turn out tasty and the result to please the owner, the following growing rules must be followed:
- It is recommended to regularly clean indoor surfaces using water with a high chlorine content. At high air humidity, the vapor of this chemical element will quickly spread and be absorbed into the straw, and then into the mushrooms.
- If water appears in the bags, it is necessary to make several slits at the bottom through which it can flow out. Liquid can interfere with the growth of mushrooms, so stagnation must be eliminated as soon as possible.
- For germination in the first two weeks, you need to choose a place where the sun's rays do not reach. Otherwise, the mycelium will develop incorrectly, which will lead to the appearance of underdeveloped oyster mushrooms.
- When moving a bag of straw, it is necessary to protect the germinating mushrooms from sunlight and wind. Therefore, it is recommended to do this in the evening, after wrapping the seedlings in a thick cloth or thick blanket.
Growing crops
First stage
As mentioned above, bags with straw seeded with mycelium are placed in a cool room for several weeks. As soon as they turn white and little white threads appear, we take them out to a warm room with a temperature of 18-20 degrees.
Warning! Keep in mind that 30 degrees will be a shock to growing mycelium, which will negatively affect the germination of mushrooms.
While the mushrooms are growing, the room is not ventilated, since oyster mushrooms require a high concentration of carbon dioxide and air humidity for normal growth. The premises must be wet cleaned with chlorine-containing products every day. After 18-25 days, incubation ends and oyster mushrooms begin to grow.
Attention! The sun's rays should not penetrate into the room, since ultraviolet radiation has a detrimental effect on the mycelium.
The first mushrooms
Bags of straw are placed vertically, at some distance from each other, so that air can circulate freely between them. For one and a half months, the humidity should be from 85 to 95 percent, and the temperature should be 10-20 degrees.
Attention! The higher the temperature, the lighter the fruiting body of the mushrooms will be; this does not affect the taste.
The light should not be intense, no more than 5 W per square meter. You need to irrigate the straw “containers” in a dry way, for example, using a spray bottle twice a day on the caps from top to bottom. Ventilation at this time is a mandatory procedure necessary for the caps to dry.
Important! Water stagnating on the caps causes them to turn yellow.
The first fruiting bodies can be harvested after 1.5 months.
Mushrooms that are ready for picking have their caps turned up, and the diameter of the largest cap should not exceed five centimeters. But the fruiting of oyster mushrooms on straw does not stop there; you can harvest the crop twice more. But provided that the legs are removed and the blocks are sorted out. When properly organized, the straw substrate produces a harvest within 6 months.
Advice! Midges love damp rooms, so that they do not bother or damage the straw; the ventilation hatches are covered with a fine mosquito net.
Temperature
In order for the mycelium to grow quickly in the straw, the temperature should not be lower than 15°C. It is better if it is from 20 to 25°C. However, the temperature in the straw bale should not exceed 30°C, otherwise the mycelium will die. In a shady place the bale is unlikely to get as hot.
The temperature can be monitored using a thermometer. If necessary, you can remove the film for a while until the temperature is below 30°C. Depending on the temperature, after 3-5 weeks the straw bale will become overgrown with oyster mushroom mycelium.
Planting mycelium
It is advisable to wash the table with a bleach solution. For stuffing you need to take a large cellophane bag. Cut off the corners and put some mycelium on the bottom. It should be milky white. If the mycelium is green, then it cannot be used, since mold has already grown on it. Then add a layer of straw. Alternate layers until the very top of the bag.
For 20 kg of straw you need to take 1 kg of mycelium. Use a knife to make holes from which mushrooms will then appear. The more holes are made, the more oyster mushrooms there will be, but they will be quite small. It is better to make them medium size.
conclusions
- There are not many rules on how to grow oyster mushrooms, but they are all of fundamental importance. The main thing is to study the issue thoroughly and follow the instructions.
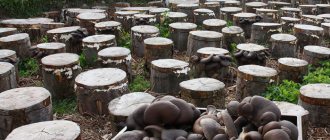
- There are several ways to grow mushrooms at home. Some grow oyster mushrooms on stumps, others in sawdust or straw.
- The basic rule is to work with clean hands in a disinfected room and maintain optimal temperature and humidity levels.
- Use two rooms to grow oyster mushrooms. In one, the mushrooms go through an incubation period, and in the second they grow.
- Don't let the mushrooms overripe. Otherwise, they will lose their taste.
How to choose a substrate for oyster mushrooms
Experts consider the nutrient substrate to be of decisive importance when growing oyster mushrooms. To successfully grow oyster mushrooms, the nutrient substrate must have high nutritional value and contain proteins, fats, carbohydrates and fiber. The most important thing on this list is proteins, because they determine how quickly the mycelium grows and how well it takes root in the substrate.
Any substrate is made from cellulose-containing materials: first of all, these are the stalks and grains of cereals, corn cobs after threshing, husks from buckwheat grains and peels from sunflower seeds, etc. Champignons, unlike most other mushrooms, are grown in compost, which is rich in nitrogen.
My mother-in-law was pouring champignon peelings onto the meadow. Then cows began to graze there, and now champignons can be picked every morning!
The substrate for oyster mushrooms is made from various grain crops that have different properties.
Thus, millet contains less sugars than other grains, so mushroom blocks made from it are considered the best - oyster mushroom mycelia adapt most quickly to them. Millet also has the lightest grain: this indicator determines how evenly the block is overgrown with mycelium.
After millet in the ranking of substrate blocks suitable for growing oyster mushrooms (and other mushrooms) is rye , followed by barley wheat closes this row . It is not recommended to use oats for preparing mushroom substrates.
When purchasing substrate blocks, you should pay attention to the absence of yellow spots, which may indicate aging of the crop, and, as always when we are dealing with mushrooms, pay attention to odors. Good, high-quality substrate blocks with mycelium always have a pleasant mushroom smell.
It should be remembered that the mycelium grown on wheat blocks has the shortest viability period (the high rate of mycelial growth lasts about two months), for barley and rye blocks - three months, and for millet blocks - more than six months.
Thus, in all respects, the best raw material for growing mushrooms will be millet, followed by rye, followed by barley and wheat.
There are many examples on FORUMHOUSE when the crop was harvested from spent mushroom blocks purchased to fertilize the site.
You buy spent oyster mushroom blocks, put them on a pallet (white side up), cut off the polyethylene, water them three times a day, keep them in the shade, harvest them, and put the remaining blocks into the garden for fertilizer. This is the easiest way.
We asked for eight blocks (straw in polyethylene) with mycelium from a Tajik specialist. The blocks were lying on the street, awaiting removal for disposal. They interested me only as mulch for garden beds, and then the young Michurinist woke up in my soul. The photo shows a five-liter bucket.
How to care for mushrooms?
After the incubation period is complete, set daily lighting to 8-10 hours. Mushrooms grow best in diffused light. At the same time, it is important to spray the bags with water and ventilate the room.
Be sure to monitor the condition of the mycelium. Check for diseases. If the mushrooms have thin long legs, then there is not enough light for them, and if the mushrooms are too small and weak, on the contrary, there is too much light.
When mold appears in the substrate, the growing process should be stopped, the mixture should be thrown away and the room should be treated.
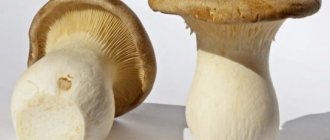
Oyster mushrooms - what kind of mushrooms are they and what is their feature?
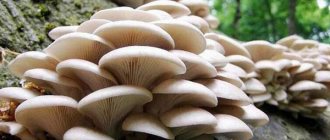
Oyster mushrooms are healthy and tasty mushrooms that grow naturally and at home. The mushrooms were named this way because of their growing conditions on tree trunks - the mushrooms seem to hang in the air.
Mushrooms have a special structure - a solid cap, slightly tapering towards the edge, smoothly turns into a stem. Oyster mushrooms come in gray, lemon yellow and ash purple colors.
You can tell that this is a young mushroom by its appearance. Fresh oyster mushrooms have elastic, juicy pulp. Over time, it becomes dry and hard.
Oyster mushrooms contain fiber, which normalizes microflora and helps eliminate toxic substances. Many people also eat this type of mushroom to boost their immunity.
Varieties of oyster mushrooms
There are several dozen species of oyster mushrooms. Among them there are both edible and non-edible mushrooms. Let's look at a few of the most common types:
- Oyster mushroom is an edible mushroom, distinguished by a fleshy cap up to 25 cm. This species feels comfortable in countries with temperate climates, growing in deciduous and mixed forests.
- Horn-shaped oyster mushroom. A characteristic feature is a small funnel-shaped cap. The color of the mushroom can be gray or light sand.
- Oak oyster mushroom. The mushroom cap is fleshy and semicircular. It is covered with scales and has a yellowish tint.
- Steppe oyster mushroom. It is considered a valuable edible red-brown mushroom. This species is characterized by the location of the legs in the center. The pulp is white.
- Pulmonary oyster mushroom. One of the most common types. The peculiarity is the fine pile at the base of the leg.
We talked about the Royal Oyster mushroom and the features of its cultivation in this article.
Technology for breeding oyster mushrooms at home
Although growing oyster mushrooms at home does not require much effort, in order to get a good harvest, you need to know several features.
Preparing the premises
Ideally there should be two of them. In one, incubation takes place, and in the second, mushrooms are directly grown. You can use a cellar, barn or garage as a room. It must be disinfected - whitewash the walls with a solution of copper sulfate. Be sure to cover the ventilation holes with mesh so that midges cannot enter the room.
The key to success is providing favorable conditions. The temperature level during incubation is 25 degrees, humidity is 70%. After incubation, maintain a temperature of up to 18 degrees and humidity from 80% to 95% .
Substrate preparation
The substrate is the nutrient medium in which the fungus grows. A prerequisite is cellulose content. As a substrate, you can use straw, corn stalks and leaves, seed or buckwheat husks and sawdust.
Before planting, be sure to clean and dry the substrate. The material is also subjected to heat treatment. To do this, it is boiled.
Oyster mushroom mycelium
Experts recommend buying mycelium in special stores. Some people do it themselves, but not everyone can prepare high-quality material. For 10 kg. purchase 400 g of mycelium substrate. Please note that the planting material must be without signs of rotting.
If you bought mycelium in advance, store it in the refrigerator for no longer than 9 days.
You can learn how to grow mycelium yourself from this article.
Planting oyster mushrooms
Before starting work, it is important to disinfect all tools and neutralize drafts. Be sure to wear gloves and protect your nose and mouth with a gauze bandage. This will prevent fungal spores from getting into your lungs.
The mycelium is planted according to the following scheme:
- Crumble the substance into a closed bag.
- Transfer the substrate to a plastic bag.
- Place a layer of planting material on top.
- Alternate layers until the bag is full.
- Release the air and tie the bag tightly.
Remember: don't use bags that are too big. The best option is a capacity of 5-7 kg.
Incubation period
Incubation takes place in a dark room. There is no need to ventilate the room at this stage. Use a fan to cool the material. Please note that the bags should not hang too close.
The incubation period depends on the type of fungus. As a rule, it is 10-14 days.
We also recommend that you read the article: “Instructions for growing champignons at home.”
The main mistakes of novice mushroom growers
As a rule, beginners make a number of common mistakes. Most people are inattentive when choosing a room for growing mushrooms. Before starting work, it is important to analyze the situation - how convenient it is to work in this room, whether you can maintain the necessary conditions there. Always give preference to a structure that is divided into two parts - one for incubation, the second for growing mushrooms.
Also, one of the common mistakes is neglecting sanitary conditions. The room must be clean. It is necessary to work with sterile gloves. Otherwise, you risk introducing microbes into the substrate and losing the entire harvest.