Many lovers of “quiet hunting” who go into the forest in early autumn become owners of valuable trophies in the form of greenfinch mushrooms, distributed throughout the territory of the former CIS countries. Most often, this fungus can be found in areas with sandy soils and mixed forests, as well as in lichen pine forests. Having a short stalk, these lamellar mushrooms absorb a large amount of sand. By following simple tips, you can thoroughly clean and process greenfinches before consumption, taking into account many nuances.
Description of the appearance and differences between false doubles
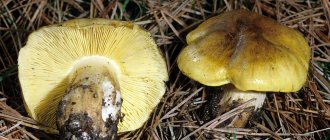
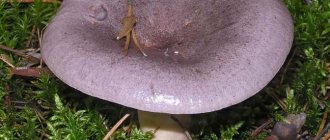
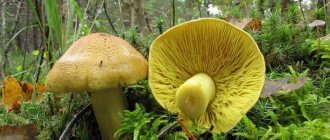
Greenfinches got their name from the characteristic greenish color of the cap, which does not change even with heat treatment. On its convex surface there are small scales to which blades of grass, dry particles of leaves and sand stick.
As it grows, the cap becomes flat and wavy along the edge. The cylindrical leg grows up to 4-10 cm and is 1–2 cm wide. The pulp and plates are usually white or yellowish in color. The smell of sandstones is pleasant, floury.
Before you go into the forest, you need to arm yourself with knowledge. The most important thing in this matter is to distinguish edible types of mushrooms from “imposters”, false rows.
| Name | Description | Distinctive features |
| Death cap | The cap is pale olive in color, the skin is smooth, the stem is thin, white with veins. | A distinctive feature is the film “skirt” under the cap. |
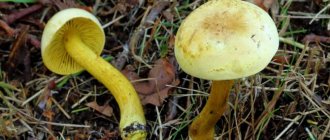
| Golden row | The surface of the cap is convex, smooth, with curved edges. The color is milky yellow. The leg is curved, fibrous. | Features: reddish spots, medicinal smell. |
| Sultry row | A bell-shaped hat with a scaly surface. The color is brown, the flesh is watery, the stem is dense. | It has a disgustingly unpleasant smell. |
| Soap row | Pale olive with a red circle in the center, smooth cap. The plates are sparse, thin, yellowish in color. There are lilac or red spots on the leg. | When cooked, it releases a soapy-fruity smell. |
| Sulfur row | A convex, velvety cap of gray or yellowish color. The leg is cone-shaped. | The aroma is hydrogen sulfide, pungent. |
Cleaning the chanterelles
How to clean chanterelles? Cleaning these representatives is not as difficult and tedious as, for example, oil. When you arrive home, you should carefully place them out of the basket in the sink so as not to break them, and begin rinsing. Particular attention should be paid to the so-called “gills” under the cap, because it is in these places that dirt, sand and other debris can accumulate. At the same stage, all unsightly places are removed and cut out. If necessary, you can walk over the surface of the cap with a soft sponge. How to clean mushrooms after this? If this is necessary, then cut off the leg with sand, and then place the chanterelles in ordinary water for 10 minutes and after this time, begin cooking.
#Faces of the City
Voting in a Mother's Day photo contest
Permians on a test drive in the Kama Valley
Wild dances and primitive people in the Perm Zoo
Ten police girls competed for the title of the most beautiful employee of the Perm region
Family selfies of Perm residents for the competition: voting has begun!
Perm residents celebrate City Day on the esplanade
Permians at Natalia Oreiro's concert on April 12
Address: 614010, Perm, st. Klara Zetkin, 10a
Phones: Advertising department 277-17-10 Editorial office 2-766-066 Distribution department 8-922-313-73-94 Commercial department mail Editorial mail
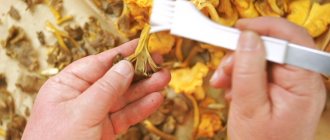
Let's start cleaning - what will be required for this task?
Mushrooms brought home will need to be first laid out on a dry flat surface (you can use newspaper for this purpose), and then all existing forest debris, sticks and leaves should be removed. Subsequent cleaning of mushrooms should be done using the following simple devices:
- The most basic item for cleaning mushrooms will be a knife, which must first be sharpened well so that processing can be done more quickly.
- A terry cloth or towel will also be needed for further storage of already cleaned mushrooms. Thanks to this matter, all unnecessary moisture will be released from the mushrooms.
- You also need to stock up on wet rags, thanks to which you can delicately clean the hats of dirt.
How to properly prepare greenfinches for further consumption
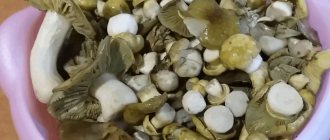
Before you start preparing fresh and dried greens, they must be boiled.
- To do this, soak dried mushrooms in cool water for an hour.
- Wash the greenfinches.
- Pour water into an enamel pan of suitable size and boil it. In this case, it is advisable to maintain a 1:1 proportion of the mass of mushrooms to the volume of liquid.
- Add 30 g of salt per 1 liter of water to the water.
- Place the dried mushrooms in salted water and bring them to a boil, then cook for 10 minutes.
- Remove the greenfinches with a slotted spoon and rinse under running cold water.
- Drain the water from the pan and fill it with clean water, preparing the same saline solution again.
- Place the greenfinches back into the pan and cook for 20 minutes.
- Then repeat steps 6–8. And cook the mushrooms again for 20 minutes. Thus, the total cooking time for green mushrooms will be 50 minutes.
Thanks to this method, you can not only thoroughly rinse the green mushrooms from sand and prepare them for further use, but also rid the mushrooms of radionuclides, reducing their amount in the product by 2-3 times. After carrying out such processing, you can begin preparing greenfinches in various ways, without fear of the possibility of poisoning and eliminating the presence of unpleasant taste sensations.
Is it necessary to soak greenfinches - the secrets of processing mushrooms before cooking
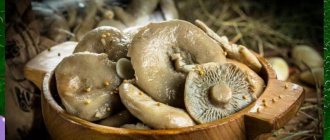
At the end of autumn, when the forest is already running out of gifts of nature with thick legs and fleshy caps, the season of greenflies begins.
These dense mushrooms are ideal for pickling and are also very tasty. Considering the characteristics of their growth, many are interested in whether greenfinches need to be soaked. Most of their “comrades” from the forest undergo careful processing before cooking, including soaking. How to prepare these mushrooms for eating or for winter preparations? It is noteworthy that the cap retains its characteristic green color even after heat treatment, only losing its saturation.
Assorted sweet compotes for the winter
General cooking rules
Standard proportions for cooking: fruits and berries occupy approximately half the jar, sugar and water are taken in a ratio of 200 g per 1 liter. As for adding water to jars, they usually pour it over the fruit twice (the third is the last) and only then proceed to preservation.
Pear is a capricious lady. Even if there is a slight darkening on the surface, it is absolutely forbidden to put it in compote. Choose strong and fresh fruits.
Berries with bitterness (like chokeberry) should be placed in the freezer for a while before adding to the compote: this will get rid of the bitterness, which will ruin the entire taste of the compote.
Compote of grapes is a separate issue. If you choose a variety that is too sweet, then instead of the desired result you will get almost nectar. Grapes can be placed in a jar as a whole bunch, having first washed them thoroughly.
Assorted compote recipes
Quite often they make fruit and berry compotes for the winter. Assorted recipes in this category are headed by plum-apricot compote with the addition of raspberries and currants
Please note that apricots and plums need to be pierced several times with a toothpick before placing in jars
Is it possible to do without sterilization?
Fact one: most home canned products not only spoil easily, but also explode. Fermented compote can still be used, but it is better to refuse experiments with an exploded one for safety reasons. Poisoning is not the worst thing that can happen: small fragments in the drink will cause more significant harm.
Fact two: a universal answer to the question “why did the compote ferment or explode?” No. It all depends on the specific fruit or berry. For example, a plum may not be sterilized in a large-scale sense, but the compote may turn out to be spoiled due to a single stale berry or not very thorough cooking. But canned drinks that contain pear are distinguished by their special tenderness: the fact is that this fruit contains very little acid necessary for preparations.
Compotes for the winter, assorted recipes for which do not require sterilization, have a number of their own rules, but much simpler ones:
- jars are always sterilized, regardless of the recipe, and so are the lids;
- As a rule, compote is poured into a jar in such a way that the liquid overflows a little - there should be no air left inside;
- The compote should cool gradually, so after twisting the jars, wrap them tightly in a blanket and only leave them to cool in this way.
Video recipe for cherry, strawberry and gooseberry compote
Choose the option at your discretion, and know: if winter compote seems too labor-intensive, cook a regular one and drink it on summer days. And then you will probably want to repeat this taste on a December evening.