Growing oyster mushrooms is not particularly difficult. I will tell you what conditions are necessary for this.
I harvest healthy hardwood: poplar, aspen, apple, pear, walnut. I cut it into stumps with a height of 30-40 cm and a diameter of at least 18 cm. On each one, I make sure to make marks (small notches) on the cut, which was located on the side of the crown. There is no need to remove the bark. Along the entire side surface of the stumps, I drill holes with a diameter of 10-15 mm, a depth of 7-10 cm at a distance of 12-15 cm from each other. I soak the workpieces in water in any container (bathtub, barrel) for 2-3 days. Fresh wood does not need to be soaked.
Landing location
In a shady, damp place in a garden plot or vegetable garden (possibly between currant bushes, gooseberries and in raspberry bushes), I dig holes 15-20 cm deep, slightly larger in diameter than stumps. In this case, it is important to maintain a distance between the holes - 30-35 cm. At the bottom of each I place moistened sawdust (or small shavings, straw) in a layer of 1-1.5 cm. On top I pour the planting mycelium of mushrooms in a layer of 1 cm and place the hemp with the notches facing up. It is very important.
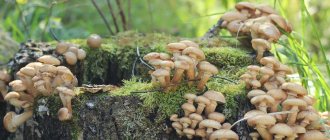
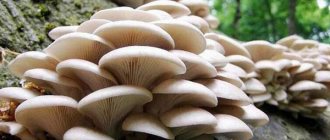
Growing oyster mushrooms on stumps
The fact is that wood has the ability to absorb water only in the direction from the root to the crown. And if the stump is positioned incorrectly, with its “roots” up, it will not absorb water from the soil and will produce a very small harvest of mushrooms (only one harvest, and in dry weather there may not be any at all).
Planting and careful care
When all the preparatory processes are completed, the most important stage begins - now you can finally plant the mushrooms. However, to get the best possible harvest, you need to plant it correctly.
Seeding mycelium
Mycelium is a kind of grain from which mushrooms grow. There are several ways to seed mycelium, but they are all similar in principle.
Important! There is no need to make a too thick layer of mycelium. A thickness of 1.5–2 cm will be sufficient.
Methods for seeding mycelium:
- Into the hole of the stump . For this method it is most convenient to use a drill. It is necessary to make holes with a diameter of 8-10 mm and a depth of 5-6 cm. If you don’t have a drill, instead of tunnels, you can make cuts of the same depth using a sharp tool - for example, an ax, or even a knife. You need to place the mycelium in the resulting recesses and cover everything with moss or just tape.
- On the cut of the bar . A disk 2-3 cm thick is cut from the stump, then mycelium is sprinkled onto the cut site. The disc is put back and secured with nails.
- Column of stumps . To do this, one tree trunk needs to be cut into several stumps. All wooden blocks are again placed in a row, with mycelium placed at each cut point. Logs can be secured in any convenient way. For example, you can make a single seam that will be secured with nails.
Mushroom care
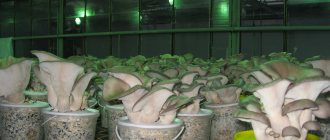
It is most convenient to care for oyster mushrooms in a greenhouse or in the basement - in this case, it is easiest to achieve the most optimal room temperature of +14...+15°C . However, this option is not always available. Therefore, it is better to focus on the most important thing - the humidity level. Constant moisture in the wood is needed to nourish the mycelium, so you need to make sure that the stumps do not dry out. For example, you can water them periodically with a hose.
Did you know? In New Zealand, they are so concerned about the local fauna that oyster mushrooms are banned. This type of mushroom is considered a parasite and is prohibited for import and cultivation in the country.
Oyster mushroom growing technology
Before placing the stumps in the hole, I fill the holes drilled in them with planting mycelium and cover the outside with wax or plugs made from wet sawdust. Instead of holes, you can make cuts, cracks and fill in the same way.
I compact the soil around the stumps installed in the holes - I trample them with my feet. To save space, wooden blanks can be stacked on top of each other, selected by diameter. I cover each or all of them together for 2-3 weeks with a piece of clean plastic film, which I must first perforate (pierce) every 10-15 cm with a nail.
For this purpose, you can use clean plastic bags or bags - put them on stumps and secure them so that they do not fly off. Such a shelter protects the mycelium and wood from drying out and promotes better survival of the planting mycelium.
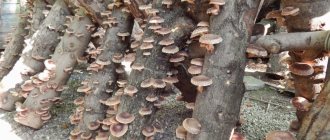
Oyster mushroom growing on a stump
Difference from false, inedible mushrooms
This fruit is difficult to confuse with other varieties of mushrooms. But inexperienced lovers of quiet hunting can easily mistakenly confuse the common woodgrass with the gray-pink milkweed, which does not secrete as much milky sap and has the smell of dry grass.
The gray-pink milkweed is an inedible mushroom, so you should look at it very carefully in the photo. Euphorbia is quite similar to some of its milky relatives. For example, the hygrophoroid milkweed is edible, does not change the color of the milky juice, and its plates are located much less frequently than those of the smooth one.
The conditionally edible non-caustic milkweed is much smaller in size, and the cap is not covered with small cracks.
How to care for oyster mushrooms?
In this way, I plant oyster mushrooms in May - early June, so that during the warm summer time the mycelium grows well in the wood. Care involves keeping the soil around the stumps moist. If weather conditions are favorable, fruiting begins in September-October of the current year. When using high-quality mycelium and certain strains (varieties), I harvest oyster mushroom fruiting bodies annually from April to November for 4-5 years, depending on the density of the wood and the diameter of the stumps.
As you can see, growing oyster mushrooms in the country is not so difficult. Try it - and you will probably be able to harvest a good harvest of mushrooms.
Characteristics and description of the mushroom
Popularly, the mushroom has several other names: spurge, milkweed, rubella, smoothy, red-brown milk mushroom and milkweed.
Appearance, photo, morphology
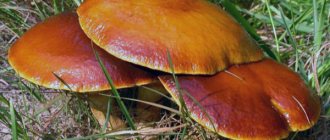
The most important difference between milkweed, which can be noticed at first glance, is color. The color of the cap is most often red, but it can be brown with shades of brown or yellow. The mushroom cap is flat and dry to the touch.
The fetal cap is quite fleshy and large in size. Its diameter can reach from 5 to 20 cm. The shape of the cap is often funnel-shaped or prostrate with a depressed center. Young fruits have a convex cap, on which you can see a small hole in the center. The edges are concave inward, and with age they become very thin. The surface is matte and may crack as the tree grows. Color varies from light orange to brown-red or burgundy.
The thick stem reaches a diameter of 4 cm and grows up to 12 cm in height. In old mushrooms, a cavity forms inside the stem. The cylindrical leg is slightly swollen or flat. Its color is often a shade lighter than the cap.
The pulp has a dense consistency, but crumbles easily. It is white, has a sweetish taste and smell of boiled crabs. The cut site becomes dark in color and secretes a large amount of milky juice, which has a slight bitter taste. The plates are white with a yellowish or pink tint.
Place of distribution
Podolekhovik is a rather rare specimen that prefers damp and moss-covered areas. It can be found in mountainous areas and mainly in deciduous forests. The fruiting body often forms mycorrhiza with coniferous or deciduous trees, most often with oak and hazel. Euphorbia grows both in small groups and individually. You can go hunting for it from mid-summer. The mushroom bears fruit until October inclusive.
Eating
Red-brown breast milk belongs to the 3rd or 4th taste category (judging by various sources of information) and is conditionally edible, like all milkweeds, that is, it necessarily requires heat treatment before use. It can be boiled, fried and prepared for the winter in the form of pickles and marinades.
Collection rules and conditions
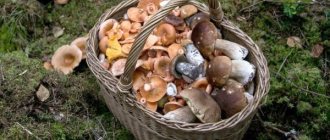
Experienced mushroom pickers advise familiarizing yourself not only with edible, but also with poisonous representatives of the mushroom world. It is prohibited to pick mushrooms in nature reserves; it is best to go to the nearest forest. If children are present when picking the fruits, then they need to be explained that they cannot taste the mushrooms and berries, because they can be deadly.
It is recommended to twist the fruiting body rather than pull it out of the soil. As a last resort, cut it with a sharp knife, although it is believed that the cut site often rots, which leads to the death of the entire mycelium. The torn fruit damages the mycelium, which means that there will be no more mushrooms in this place.
You should not collect nut shells near roads or industrial zones, because such fruits have absorbed a lot of toxins and other harmful substances.
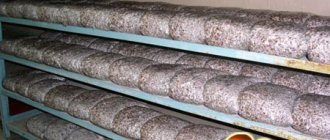
Substrate production
If you decide not to purchase a substrate, but to make it yourself, follow the step-by-step instructions below:
- Decide on the raw materials on which your crop will grow. The practice of experienced farmers shows that oyster mushrooms develop best in straw, sawdust, sunflower husks or corn cobs.
- Prepare the material by chopping it into equal fragments (the optimal size is 4-5 centimeters).
- Place the resulting mass in a large cooking container (for example, a tank), fill with cold, clean water. The ideal ratio of liquid to raw materials is 2:1.
- Boil the future substrate for 2-3 hours, drain the water and wait until the excess liquid drains and the base cools to room temperature.
After completing the last stage, the substrate is ready for laying.
Basement preparation
So, what should be in the basement in which oyster mushrooms and shiitake are grown?
1.
Stable temperature from 10 to 20°C.
2.
Air humidity is from 85 to 90%.
3.
Sophisticated ventilation system.
4.
Free from mold and pests.
5.
Purity.
If, after studying the list, you find any problems, be sure to fix them. It is recommended to start preparation with cleaning. It will allow you to find the sources of problems and free up space for shelving and equipment.
To achieve the required temperature, you need to make the room airtight and think through the heating system. Typically, to warm the basement you need to insulate the floor and walls. After this, you will only need one heater, which must be turned on once a day.
Mold in the basement for growing vegetables can be a serious obstacle to a rich harvest. Fight it by warming up the room, regular cleaning and coating the walls with special antifungal paint.
At the slightest suspicion of pests, call a professional or carry out pest control yourself. It is most convenient to use a smoke bomb and industrial insecticides. Remember that after treatment, at least 1 week must pass before laying the blocks with the substrate.
The last step in preparing the basement is thorough cleaning and disinfection. It is carried out using a 1% chlorine solution or bleach. Please note that in addition to the basement, you will need a separate, warmer room for incubating oyster mushrooms.
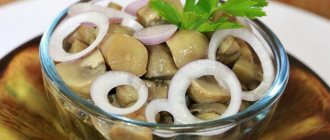
Recipes and cooking features
Euphorbia is most suitable for pickling and pickling. But it can be fried, boiled and dried. Before use, the mushroom does not need to be soaked for a long time, because it does not have any particular bitterness and is not damaged by insects.
The simplest way to prepare hazelnut is cold salting. The harvested crop is washed well in cold water, after which the fruits are laid out in layers in a wooden barrel. Each layer must be sprinkled with table salt.
Pickling the pine tree
For 3 kg of mushrooms you will need 130-150 g of salt. The barrel (or other suitable container) is transferred to the cold for a month, after which you can try the salted nutwood. If they are too salty, they are soaked in boiled cold water for several hours.
Euphorbia does not require pre-soaking or boiling, so you can simply fry it in a frying pan or make a delicious creamy soup. For soup (for 10 servings) you will need the following ingredients:
- 800 g of pine nuts;
- two medium onions;
- 200 g butter;
- 600 g milk;
- 500 ml water;
- 3 tbsp. flour;
- salt and ground black pepper - to taste.
Mushroom cream soup
First, melt the butter in a frying pan and fry the onion, cut into half rings, until golden brown. The mushrooms, washed and cut into small pieces, are fried for about 15 minutes. At this time, pour water into the pan and add pepper and salt. After boiling, pour the contents of the frying pan into it.
Boil over low heat for 5 minutes, then slowly pour in the milk and bring to a boil. Carefully pour in the flour while stirring constantly. Remove the pan from the stove and beat the contents using a blender. When serving, you can decorate the cream soup with a sprig of herbs.
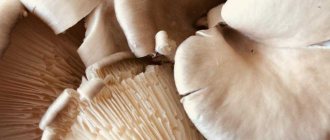
Varieties for growing in the basement
If a person has a desire to grow oyster mushrooms in his basement, he can use absolutely any variety of mushroom for this. The only thing worth paying attention to is creating the necessary conditions for a particular type of mushroom. The most popular is the oyster mushroom. This variety can be called one of the most valuable that can be found in nature.
Read more: arranging a basement for growing mushrooms.
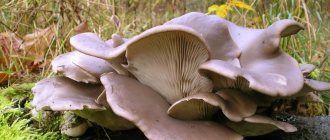
The cap of this mushroom is usually dark gray with a purple, brown or bluish tint. It is this type of oyster mushroom that is most suitable for growing under artificial conditions. In this case, a person will have a much better chance of reaping a large harvest when compared with other varieties.
Also, do not forget about the common oyster mushroom, which is also popular among mushroom pickers. In nature, this fungus can be found on stumps, as well as fallen trees in the trunks of deciduous trees. This oyster mushroom bears fruit from the first months of summer until December. It has a pleasant smell, has white pulp, and as for the spore powder, it looks like a pinkish or white substance.
In this video you will learn more about growing oyster mushrooms:
Transplantation into open ground
In May, stumps with oyster mushrooms can be moved into the garden. Readiness for planting on open ground can be judged by the presence of a dense white coating. For the most successful fruiting of the mycelium, it is advisable to place the logs in the shade, for example, under densely leafy trees.
Wet leaves are lined at the bottom of pre-dug holes, and then stumps are planted. It is important that the depth of planting of logs does not exceed fifteen centimeters. The distance between adjacent logs should be about half a meter. Further care of the plantings consists of periodically moistening the soil around the logs. The first harvest can be harvested in early autumn.
With the onset of winter, it is recommended to wrap the stumps with spruce branches, leaves or straw. Such a mycelium will bear fruit abundantly for several years in a row. The maximum mushroom harvest can be harvested in the second and third years.
Publication date: Growing at home
Mycelium selection
There are several types of mycelium: grain and compost . To grow oyster mushrooms, it is better to use the first option, since it does not involve additional processing of planting material.
Important! If the walls of the basement are covered with fungus, then you should not grow oyster mushrooms in it. Since they require a high level of humidity, the disease can develop and affect the future harvest.
When choosing planting material, the following features must be taken into account:
- Color . High-quality mycelium is characterized by a yellow-orange hue. If dark spots are visible on the surface, it means that the planting material is affected by mold. It is prohibited to use it, as it will negatively affect the future harvest.
- Smell . It should be fresh and have a characteristic mushroom aroma. If you smell ammonia, it means that the planting material was not in the right conditions and has deteriorated.
- Manufacturer . Buy mycelium only from well-known manufacturers, because they value their reputation and will not sell a low-quality product. It is best to buy a small amount of planting material and try it. If germination is good, then after a while you can purchase large quantities.
Preparation and sowing of mycelium
Experienced mushroom pickers do not purchase mycelium in advance, as they know that it is only suitable for 5 days. One mycelium weighing about 250 g will provide one block of oyster mushrooms. In this regard, it is necessary to think in advance about the required amount of mycelium. It is fertilized with special natural additives to increase productivity.
Don’t forget to think about the amount of mycelium in advance
Each additive is added at the time of filling the bags, and solutions - at the time of planting. Before carrying out any work, it is worth disinfecting all surfaces, as well as gloves for work. Every person must remember that growing oyster mushrooms necessarily requires compliance with sanitary rules.
Fighting tinder fungus - 4 steps
To get rid of tinder fungus and prevent its appearance in the garden, you need to know the following:
- All diseases and pests settle, as a rule, on weakened plants, so you need to provide your garden with good nutrition, care, and the correct watering regime so that the trees do not weaken;
- Fungal spores can be destroyed by eradicating early spring and autumn treatments of trees with a three percent Bordeaux mixture or a five percent solution of ferrous sulfate. They need to be done when the trees are without leaves;
- Inspect your plants for mechanical damage and if you find the slightest wounds, treat them with a three percent solution of copper sulfate or at least garden varnish;
- Collect ripening mycelium from trees and be sure to burn them. The mycelium ripens around August, and then the spores scatter throughout the area, so try to remove the mycelium and destroy it before mid-summer.
Since saving my huge nut from the tinder fungus is problematic, I decided to cut it down. It's a pity, of course, it provided good shade. But it’s better that in its place I’ll plant some kind of fast-growing plant that will decorate the area near the house and create shade. And I will install a pergola for this vine.
I have already planted three large-fruited nuts at the end of the plot, so I can get rid of the diseased tree. It won't be cheap to cut down such a huge nut, but I'm afraid that repairing my neighbor's roof after another branch falls will cost me more.
It rained, and other mushrooms sprouted on my site - puffballs. They may be edible, but I won't risk it. I’ll walk around the garden and examine the trees: maybe there are still some tinder fungi lurking somewhere.
I wish you and your garden good health.
- Weeds and ways to combat them
When is the best time to plant oyster mushrooms on stumps?
It is advisable to start growing these mushrooms in the autumn months. It is during this period that they do not require frequent watering, and the crop ripens much faster. If with spring sowing you can enjoy mushrooms after a year and a half, then with autumn sowing - in just a year. In the first six months, oyster mushrooms require special care, including frequent watering.
All of the above does not mean that you need to abandon the spring sowing of mycelium. It’s just that in such cases, the logs with the future harvest are not dug into the ground, but placed in the basement and covered with wet burlap so that they gradually become overgrown with mycelium. In the fall, they are removed from the cellar and buried in the ground.