Foods like mushrooms are valuable and nutritious foods. At home, growing oyster mushrooms and champignons has become widespread. Such cultivation guarantees the absence of carcinogenic substances and nitrates, which are easily absorbed by mushrooms.
Oyster mushrooms are recommended for use by patients with hypertension, cancer and some others. They slow down the aging process and help rejuvenate.
The article tells you how to grow mushrooms and make oyster mushroom mycelium with your own hands.
What is oyster mushroom mycelium, history of breeding
The mycelium of any mushroom, including oyster mushrooms, is called its vegetative body, in other words, the mycelium, consisting of the finest branched root-threads. The development of mycelium occurs inside the substrate and on its surface. This extensive network can be obtained both at home and using laboratory methods.
In their natural habitat, mushrooms reproduce mainly by spores. In order to answer the question of how to make oyster mushroom mycelium within the walls of the laboratory, scientists tried several different methods.
At first, fragments of mycelium for propagation in greenhouses specially adapted for this purpose were taken from the forest, in places where mushrooms accumulated, and then planted in prepared soil. After it was completely intertwined with mushroom threads, the substrate was dried and ready for breeding. The qualitative characteristics of such material were weak, the mycelium degenerated and produced meager yields.
Later in France they found a way to remove mycelium from mushroom spores under artificial conditions, which was very limited in application and also did not take root.
The latest and generally accepted patented method was the cultivation of oyster mushroom mycelium on the grain of almost any grain crop, sawdust, and straw.
A word of praise about oyster mushrooms
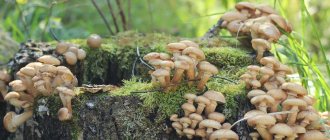
One of the most popular species for growing at home is oyster mushroom, which belongs to the so-called category. “predatory” or wood-destroying fungi. The habitat of oyster mushrooms in the wild is living but weakened deciduous (sometimes coniferous) trees, stumps and dead wood. Penetrating into tree trunks through cracks and causing the formation of yellow mixed rot, it contributes to the death of the tree and can live on it even after it dries. One of the food sources for the oyster mushroom in this case is nematodes, which it can paralyze with the help of the nematotoxin it secretes and subsequently digest. This is how she receives the nitrogen necessary for her development. With all this, oyster mushroom is very highly valued due to the fact that:
- low-calorie (38-41 kcal), which is why it is classified as a dietary product.
- In terms of the amount of protein and amino acids, it surpasses most vegetables, second only to legumes, and is comparable only to meat and dairy products.
- contains all B-vitamins, as well as ascorbic acid, vitamins PP, E and ergocalciferol, which regulates the metabolism of calcium and phosphorus in the body.
- is a source of fat-soluble and water-soluble vitamins and in this capacity is comparable to meat and meat products, vegetables and fruits.
- one of its features is a high content of carbohydrates (from 68 to 74%), a third of which are easily digestible), low concentration of fats (only 2.2 mg per 100 g of dry weight) and high fatty acids (up to 67% ).
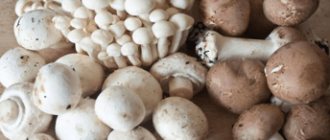
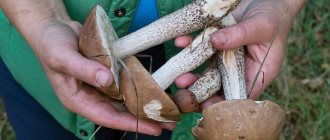
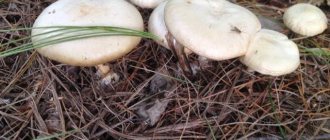
It is not surprising that its value is highly appreciated in different countries of the world, including Russia and Ukraine. Oyster mushroom is one of the few mushrooms produced on an industrial scale, so finding it in a store, supermarket or market is not difficult. However, many people strive to grow it themselves. Only young mushrooms up to 7-10 cm in size are used for food, since old ones are hard and fibrous.
Methods of growing mushrooms
Oyster mushrooms are very unpretentious mushrooms that quickly produce crops. Already a month and a half after disembarkation, you can make the first collection. From a square meter of plot you usually get about ten kilograms of mushrooms per month.
Several methods can be used to grow this product:
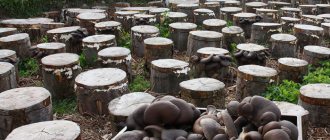
- Extensive. This method imitates natural growth and requires certain areas. Tree stumps are prepared for it, cuts are made in them and first the oyster mushroom caps and then parts of the mycelium are placed in them. The method depends on weather conditions: under unfavorable circumstances, mushroom growth can take three months.
- Intensive. Mushrooms are grown this way, for example, in plastic bags. It is very effective, does not require much labor and is inexpensive.
To grow mushrooms at home, you can get mycelium in two ways: buy oyster mushroom mycelium, the price of which is currently about 150 rubles. per kilo, or make it yourself.
Preparing the growing site
To grow high-quality and productive oyster mushroom mycelium, it is necessary to properly prepare the growing site.
Most often, mushroom growing enthusiasts use several methods for creating planting material:
On cardboard
This method is considered simpler and cleaner. Its main advantages include:
- Prevention of the development of pathogenic bacteria, since it is impossible for them to develop on paper.
- Accelerated colonization of fungal spores.
- Better air supply to planting material if the farmer uses corrugated cardboard.
- Moisture evaporates more slowly.
- Constant sterilization of the growing area is not required.
- Availability for the consumer. You can buy sheets of cardboard at any office supply store for a low price.
- Large quantities of seed at low cost.
Step-by-step instructions for growing oyster mushroom mycelium on cardboard are as follows:
- Chop the leaves and pour boiling water over them. Keep them in this state for at least 60 minutes.
- Prepare plastic containers. You can use glasses or cut bottles. Make a small hole in the bottom. After this, pour boiling water over the containers to disinfect.
- Prepare the seed. Most often, elements of the above-ground part of the fungus or parts of the root system are used. Divide the stem and cap into fibers. For these purposes, you need to use a knife or blade, which is first disinfected with alcohol.
- Squeeze out excess moisture from the cardboard and mix it with seed material.
- Place the mixture in the prepared containers and compact it a little. Cover the neck with cling film or a plastic bag.
- Place the containers in a warm place out of direct sunlight.
- Water the seed daily with warm water using a spray bottle.
- Every day, remove the film for 5-10 minutes to allow air to enter.
- If all actions are carried out correctly, then after a few months a white fluffy coating will form on the cardboard.
Sources:
https://fermoved.ru/gribyi/micelij-veshenki.html https://countryhouse.pro/vyrashhivanie-mitselij-veshenki-v-domashnih-usloviyah/ https://fermer.blog/bok/griby/sedobnye-griby /veshenki/veshenki-vyraschivanie/13821-vyrashhivanie-micelija-vjoshenok.html
Making mycelium
Oyster mushroom mycelium - mycelium - is planted in the substrate, where it will germinate. At home, you can grow oyster mushroom mycelium on wood or grain with your own hands. Cultivation occurs in three stages as follows:
- Obtaining royal mycelium. It is made in the laboratory from spores and stored in test tubes, or the material is propagated from pieces of mushroom tissue.
- Preparation of intermediate mycelium. At this stage, the mother culture is transferred from the test tubes where it was stored into a nutrient medium, where the basis for the seed mycelium begins to develop.
- Obtaining seed mycelium. The intermediate material is sown into the substrate, where it grows. Parts of this substrate are used to sow the area where the mushrooms will be directly grown.
Growing mycelium on cardboard
You can also try growing oyster mushrooms on regular cardboard. Those who have tried this method claim that it is simple and very effective. Here's what you need for this:
- pick up corrugated brown cardboard. It is advisable that there is no paint or inscriptions on it. If they exist, these places need to be removed.
- cut or tear it into several pieces.
- Pour warm boiled water into a clean bowl and soak the pieces of cardboard in it for about one hour. While they are soaking, you should prepare the material in the manner described above: by cutting the mushroom stem in half and cutting out the required number of pieces from it.
- Drain the water from the cardboard and carefully remove its top layer.
- Place the oyster mushroom pieces on the corrugated part, cover with the removed layer, place in the prepared container and press so that there are no voids left between the pieces and the cardboard.
- cover the container with a bag so as to protect the contents from drying out, and place it in a dark, warm place. It needs to be ventilated daily and the humidity of the cardboard should be controlled: it should always be damp. If you notice the first signs of drying out, it should be moistened using a spray bottle.
If everything is done correctly, then after two months the cardboard will turn completely white. This means that the mycelium has grown, after which the cardboard with the finished oyster mushroom mycelium can be used in the same environment as that grown in jars - for example, on pasteurized straw.
How to prepare the base for planting
To obtain a good harvest, it is necessary to properly prepare the soil for planting. The manufacturing technology requires that for this you need to grind dry and clean husks, straw and husks (barley or wheat), and then heat treat them. These actions will remove from the composition the insects that got into it during collection.
In order to thermally treat the substrate, it is placed in a large metal basin, filled with hot water (70 ° C) and boiled for a couple of hours, after which the liquid is drained and the mass is cooled to room temperature. To check moisture saturation, a small amount of the mixture is squeezed in a fist: for normal humidity (about 70%), little moisture or nothing at all should come out; overmoistening is not allowed.
For growing, both a greenhouse with stumps installed in it and large plastic bags on the balcony at home are suitable. Below we will discuss how to prepare oyster mushroom mycelium at home, plant and grow a mushroom crop. Oyster mushroom is the only mushroom that is easy to grow if all the necessary conditions are met.
FAQ. Answers on questions
Why are oyster mushrooms attractive?
Oyster mushrooms (also called oyster mushrooms) are a unique species that can grow in almost any soil, including dry grass, cotton fabric, thyrsus, or even coffee grounds! Being short-growing, oyster mushrooms can extract nutrients from everything that surrounds them.
What's the best way to grow?
It is cheaper and more convenient to grow oyster mushrooms in bags - in this case they will require special supports with hangers. Give preference to plastic equipment - it will not rust and will be cheaper. You can also grow mushrooms on stumps.
What substrate should I use for growing?
Let's consider the best substrate options for growing mushrooms: dry straw (buckwheat, barley or wheat), dried corn cobs and stalks, sunflower seed husks, sawdust (hardwood).
What should the room temperature be?
There is no need to create a greenhouse, but you cannot do without insulation and thermal insulation to retain moisture. The simplest heating devices must also be present so that the temperature is at least +13 degrees. A higher temperature (about +22-25 degrees) will only be required at first, immediately after planting the mycelium. The use of IR lamps is allowed.
Oyster mushroom - a delicacy accessible to everyone
From the forest to the freezer: how to properly freeze mushrooms for the winter
Yellow-brown oiler - a mushroom from coniferous forests
White fly agaric is a deadly poisonous mushroom
The goat mushroom is inconspicuous, but it’s delicious
Common oakberry - excellent taste
Satanic mushroom - controversially poisonous mushroom
Polish mushroom - a “delicacy” from coniferous forests
Oyster mushroom mycelium at home: stage one
To obtain royal mycelium, parts of the fruiting body of fresh mushrooms are taken. The oyster mushroom needs to be divided in half and a small piece cut out from the stem. Then it must be dipped in a solution of hydrogen peroxide for disinfection - the material is ready for planting in a nutrient medium.
Then the treated piece is placed in a container with a nutrient substance and closed with a stopper disinfected by fire. Such home production of oyster mushroom mycelium requires mandatory sterility, therefore, after processing, the material should not be touched with hands, but taken with auxiliary tools; the room must also be kept clean.
A closed container with seedling material placed inside in an inclined position is left in the dark for a couple of weeks.
The nutrient medium in this production can be agar from wort, carrots, oatmeal, potatoes or glucose. After preparation, it is sterilized, poured into containers and waited for it to harden, after which a piece of mushroom is added.
The first stage is growing a mother culture
To grow royal mycelium, you need to prepare fresh oyster mushrooms. As mentioned above, the material can be obtained from part of the mushroom itself. So, you need to cut the oyster mushroom in half, and then cut out a small piece at the top of the leg. Next, you need to place a piece of oyster mushroom in a special nutrient medium. However, the mushroom must be completely sterile. Therefore, it should be placed in peroxide for a couple of seconds. Then the test tube with the nutrient medium is held over the flame and the prepared piece of mushroom is lowered into it. The stopper for the test tube is fired over a fire and the glass container is tightly closed.
Attention! The closed tube must be moved very carefully. It is taken not by the cork itself, but with both hands, holding the test tube and the cork at the same time.
After this has been done, the test tubes with the material should be placed in a dark place. The air temperature in it should be about =24 °C. After just a few weeks, the finished material can be planted in the substrate.
The question may also arise, how to make a suitable nutrient base for growing a mother culture? So, it is also very easy to do with your own hands. To prepare a special medium, different types of agar are suitable:
- oat;
- potato-glucose;
- carrot;
- wort-agar.
This medium is poured into test tubes that will need to be sterilized. Next, they are installed slightly tilting. This is done so that the growing medium has more space. When the medium has cooled completely, you can add the prepared piece of mushroom.
Important! During the cultivation process, the mother medium must be kept sterile. Not only the equipment and premises should be clean, but also your hands. Before work, I make sure to disinfect the work surface, and keep the necessary equipment above the burner.
Stage two: obtaining intermediate mycelium
The second stage is the direct cultivation of oyster mushroom mycelium. The technology for producing intermediate mycelium of the oyster mushroom requires the use of cereal grains. For these purposes, healthy, high-quality grains are used, which are boiled for fifteen minutes in a ratio of material and water of one to two. Then the boiled grains must be thoroughly dried and mixed with calcium carbonate and gypsum.
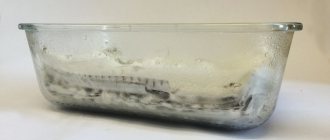
Next, the mixture is placed in glass containers, filling them two-thirds, and sterilized. After processing, pieces of the nutrient medium prepared earlier are placed into the resulting substance. After two to three weeks, when the mycelium has grown, it can be stored, having first been placed in plastic bags. The mycelium can be stored for three months at temperatures from zero to twenty degrees.
Properly prepared intermediate oyster mushroom mycelium with your own hands, which is developed and viable, looks like a lush white coating that has a pleasant mushroom smell.
To plant seed mycelium, perform similar actions, sowing larger containers. To do this, add one spoon of intermediate mycelium to liter jars. This prepares the substrate for further growing mushrooms on it.
Further propagation of mycelium
If the task is to further propagate the champignon mycelium, the contents of the test tubes are added to large jars filled 2/3 with substrate. This procedure also requires sterile conditions:
- a depression is prepared in the substrate contained in the jar, after which it is tightly closed with a metal lid;
- a hole must be made in it, closed with a soft stopper;
- jars prepared in this way are placed in autoclaves for 2-hour sterilization under pressure (2 atm.);
- jars should cool in a sterile room;
- when the temperature drops to 24 degrees, you can add a mother culture of champignons to the substrate.
Manipulations are carried out over a burner flame. Having opened the test tube, a fungal culture is removed from it using an inoculation loop. Quickly removing the cork from the jar hole, insert the champignon mycelium into the recess in the substrate and close the jar.
Conditions for planting mycelium
You can grow oyster mushrooms in an old barn, stone garage or other suitable room. The criterion for its selection can be considered:
- the ability to create high air humidity, which should be maintained at 85-90%;
- maintaining the ambient temperature around 15-20 degrees - at higher temperatures, the mushrooms stop bearing fruit;
- creating a good ventilation system - the accumulation of carbon dioxide is unacceptable due to the high sensitivity of fungi to it;
- the possibility of sufficient lighting - sunlight without direct rays or fluorescent lamps for nine hours a day.
Mushroom growing technology
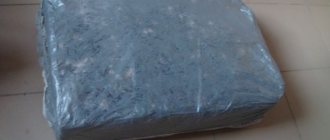
After you have grown oyster mushroom mycelium with your own hands, you can begin planting it, which is done as follows. One kilogram of substrate is laid out at the bottom of a plastic bag, and a layer of mycelium is placed on top of it, and so on layer by layer until the very top. The weight ratio of the substrate and mycelium in the bag should be 1:0.05. The mycelium should be placed closer to the walls of the bag, in which slits should be made to allow air to enter. The weight of the finished block is 13-15 kg.
After filling, the polyethylene blocks are left in the dark at a temperature of about plus twenty Celsius - a higher temperature can lead to the death of the mycelium, since inside the block it can be ten to fifteen degrees hotter.
After two weeks, the block looks like a white monolith. Before the appearance of primordia, the block is sprayed from time to time to maintain humidity and temperature conditions are strictly observed. After the appearance of primordia, after a couple of days they become full-fledged adult mushrooms. There is no need to water them during growth, but it is important to ventilate the room well. When the edges of the caps are aligned, the crop is ready to harvest.
How to harvest oyster mushrooms?
These mushrooms have a fairly short fruiting period - only 30-35 days . This is explained by the high frequency of fruiting (approximately every 7-9 days). Consequently, the first harvest can be harvested 9 days after planting the mycelium.
Carefully cut off the oyster mushrooms with a knife, being careful not to damage the main root attached to the mycelium. Do not cut off absolutely all the mushrooms from the mycelium - leave a few of the smallest fruits on the stems (otherwise the mycelium will dry out and stop bearing fruit).
See also : Black milk mushroom is a royal delicacy. In addition, you will probably be interested in real saffron milk cap - a true gourmet delicacy.
Conditions for the preservation of mycelium
In industrial conditions, the mycelium is stored in low-temperature conditions or in liquid nitrogen. This content allows you to maximally preserve the properties of the material and its germination without loss of quality. The process of freezing and subsequent defrosting for disembarkation is carried out slowly under the supervision of specialists.
For home production, it is best to store mycelium in types of refrigerators that allow the freezer temperature to be set within minus twenty degrees Celsius. This will allow the material not to deteriorate and lose its qualities.
After defrosting for a short time, the mycelium restores its vegetative functions.
It is important to avoid repeated sudden changes in temperature conditions, that is, defrosting and re-freezing. This can significantly deteriorate the quality of the mycelium, which, accordingly, will negatively affect the yield of the mycelium.
Useful tips for mushroom pickers
To successfully grow mycelium and mushroom harvest, the following rules must be observed:
- The ideal substrate is sawdust from deciduous trees.
- The color of the sawdust used should be white or yellow, this will guarantee its freshness.
- The substrate should have a fresh smell, without any rot.
- When transporting mycelium, the required humidity should be maintained within 30-45%. The same conditions must be observed inside the plastic bag in which oyster mushrooms are grown.
- One block bag measuring 35 x 75 cm will require about 300 grams of mycelium; you need to know this in order to accurately calculate the required amount of material. Buying for future use or thawing excess amounts of mycelium is extremely undesirable due to short shelf life and loss of seed quality.
- When producing mycelium and planting it in the substrate, it is necessary to follow strict sanitation rules to avoid infection by pests: containers, tools and hands must be disinfected.
In general, if you follow the rules and technology for growing oyster mushroom mycelium, and then the mushroom itself, you can achieve good results with not a very large investment of money and effort. With careful attention to the process, even a beginner can handle it.
Obtaining a nutrient medium for mycelium
The technology for growing champignon mycelium requires an appropriate nutrient medium. It comes in three types.
Wort agar is prepared using the following technology:
- one liter of beer wort and about 20 grams of agar-agar are mixed;
- the mixture is heated while stirring until the jelly is completely dissolved;
- sterile tubes are filled to one third of the volume with the hot mixture;
- test tubes closed with cotton-gauze swabs are sterilized for 30 minutes under appropriate conditions (P = 1.5 atm., t = 101 degrees);
- further, they are installed obliquely to increase the surface of the nutrient medium, while the contents should not touch the plug.
Oatmeal agar is prepared from such components as water - 970 g, oat flour - 30 g and agar-agar - 15 g. The mixture is boiled for an hour, then filtered through a gauze filter.
Carrot agar combines 15 g of agar-agar with 600 g of water and 400 g of carrot extract. After boiling for 30 minutes, the mixture is passed through a gauze filter.