I am interested in biomaterials that can go back into the earth and support a circular economy (an economy based on renewing resources). This project is the start of a larger project that will consist of homemade contraptions and will use food waste and biomaterials. The project will attract people's attention and help them understand a lot about the journey of the things in their homes, ultimately reducing their consumption and reducing their environmental impact.
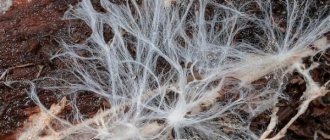
The mycelium is the reproductive part of the fungus, consisting of a mass of branching, thread-like hyphae.
Mycelium is a fast-growing organism, and one of its main uses is the decomposition of organic compounds. Petroleum products and some pesticides are organic molecules because they are built on a carbon structure. Therefore, they can be a potential source of carbon for the mycelium. This means that the mycelium has the potential to consume these pollutants from its environment (as long as the chemicals are not toxic to the fungus), which has great potential for a circular economy to reduce the environmental impact of plastics. As part of my research, I will continue to experiment with the potential of this material to uncover its profound implications for the physical world.
This instruction will teach you how to create oyster mushroom mycelium with your own hands - this is not a finished product, but a material open for experimentation. Be creative!
To grow oyster mushroom mycelium at home you will need:
- Resealable container - a glass container with a lid is ideal
- Corrugated cardboard
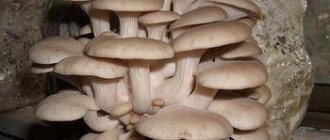
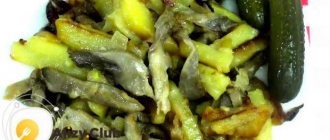
- Mushroom with a large base - I used steppe oyster mushroom
- Scalpel or small knife
- Dark room - a bucket will do
How to protect plantings from pests
If there are mistakes in growing mushrooms, they can be affected by pathogenic bacteria and harmful insects. To prevent this from happening, you must adhere to the following rules:
- regularly disinfect the premises where champignons are grown;
- carry out high-quality processing of the substrate;
- use planting material grown under sterile conditions;
- regularly replace the soil;
- observe sanitary and hygienic measures during planting and care;
- maintain the required microclimate.
So, growing champignons from mycelium at home is not difficult. The main thing is to purchase or grow high-quality planting material and substrate, follow planting technology, maintain the necessary microclimate and carry out regular maintenance.
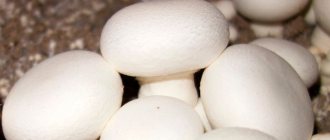
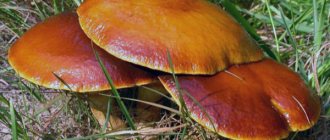
Growing champignons
It is not difficult to germinate champignons from mycelium. It is enough to know in what conditions it should grow, how to make it, where to plant it and what the soil should be like for planting. You will also need to become familiar with the technology and practice planting mycelium.
To cultivate mushrooms, the following conditions will be required:
- high humidity;
- temperature within +23…+30°С;
- sufficient light supply;
- good air flow and circulation.
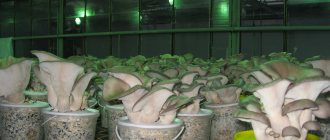
Today there are several ways to cultivate mushrooms:
- in containers;
- in bags;
- in briquettes.
How to create sterile conditions
Sterile conditions for growing mycelium are necessary to avoid infection with diseases. They can be achieved by placing the substrate in a bunker, which is treated with hot steam. Such a room must have strong ventilation. Typically, air is supplied through nozzles that are located under the floor. At home, such a system is not used due to its complexity. Bunkers are used only for industrial planting.
Mycelium should be grown properly under sterile conditions. For the process, it is necessary to purchase special equipment, as well as prepare several rooms.
If we talk about sterility when growing mycelium at home, then we are talking about disinfecting the room in the following ways:
- Fumigation with a sulfur bomb.
- Whitewash the walls and ceiling with a mixture of lime and copper sulfate.
- Spraying with formaldehyde (4%).
If you suspect the presence of pests in the room, treat with chlorophos. After disinfection has been carried out, the room should be ventilated for several days. To protect it from infection from the outside, it is recommended to place a container of sawdust pre-treated with a disinfectant solution in front of the entrance.
Did you know? For a long period, champignons were very expensive and were available only to wealthy people. During the reign of monarchs, special rooms were made for growing mushrooms, which were served to the table of royal persons.
How to make champignon mycelium at home
To breed mycelium, it is necessary to prepare a nutrient medium. It can be of three types:
- wort agar;
- oat agar;
- carrot agar.
The preparation technologies for these types can be found in the table:
| Name of culture medium | Components | Step-by-step cooking instructions |
| Wort agar |
|
|
| Oat agar |
|
|
| Carrot agar |
|
|
After the nutrient medium has hardened, it is necessary to take pieces of the mushroom stem with tweezers, pre-treated with disinfectants, dip them in hydrogen peroxide and place them in test tubes. You must operate under sterile conditions. Transfer into test tubes must be done while constantly heating them over a burner. After the particle is placed in the substrate, the test tube should be tightly sealed.
For mycelium to germinate, it must be placed in a room without light. After 14 days, the mycelium should fill the entire test tube. The mycelium should be stored at a temperature of +2°C. For further propagation, the mycelium should be moved to large containers filled 2/3 with substrate. Jars of soil must be sterilized in an autoclave for two hours. The mycelium is transferred after the substrate has cooled to +24°C.
Grain mycelium is obtained in a different way. The technology for preparing the substrate for germination is as follows:
- Place two parts of wheat or oats in 3 parts of water with the addition of hydrogen peroxide (1:10).
- Boil the liquid.
- Cook for 20–30 minutes until the grains soften.
- Remove the grains and dry.
- Place them in jars, filling ¾ of the volume.
- Perform sterilization.
- Add the mother culture to the substrate.
- Place the containers in a thermostat, which constantly maintains a temperature of +24°C and a humidity of 60%.
After the mycelium fills the entire substrate, you can start sowing it. You can store grain mycelium for 4 months at a temperature of 0...+2°C. Another way to grow mycelium, the simplest and most economical, is on cardboard. Corrugated thick brown paper is suitable for this purpose.
You can germinate mycelium as follows:
- Cut the cardboard into small pieces.
- Dip it in warm boiled water for 60 minutes.
- Place in a plastic container with holes for drainage.
- Using a disinfected knife, separate the champignon into fibers.
- Remove the top layer from the cardboard.
- Dip in hydrogen peroxide and distribute mushroom pieces over the corrugated surface.
- Cover with the removed top layer.
- Compact.
- Cover the plastic container with film.
- Place in a room where there is no sunlight and a warm temperature is maintained.
It is necessary to ventilate the plantings daily and ensure that the cardboard does not dry out. Periodically it needs to be moistened with a spray bottle. The mycelium will germinate for about three months. After it completely covers the cardboard, it can be transplanted to a permanent place. Coffee grounds, tea leaves, and paper are also suitable as a substrate for growing mycelium.
Video: DIY champignon mycelium
Choosing a landing site
The room most often used for cultivating mushrooms at home is the basement. It is here that you can achieve optimal conditions for obtaining a good mushroom harvest. It is important to install forced ventilation, a thermometer and a hygrometer in it to monitor conditions. If you plan to grow champignons throughout the year, you will need equipment with a heating system.
It is advisable to divide the basement into 2 zones:
- for incubating mycelium at a temperature of +23…+ 30°C;
- for fruiting - with a temperature of +16...+ 17°C.
If possible, you should set up an area for preparatory work, where compost will be prepared.
How to plant champignon mycelium
For planting, you need to prepare or purchase a nutrient substrate. This is the most important stage in growing representatives of the mushroom kingdom. If mycelium purchased ready-made is germinated, then the substrate must be made in accordance with the manufacturer’s instructions on the packaging or purchased ready-made in a specialized store.
When sowing your own planting material, you need to prepare the soil, following the general rules. For home planting, compost based on horse manure obtained from animals that eat hay is best suited.
Important! When planting on horse manure, you can achieve maximum fruiting.
Cultivation in poultry droppings and cow dung results in lower yields. Here are several options for making a substrate:
- manure with a moisture content of 40–45% (850 kg), mixed with urea (3 kg), superphosphate (13 kg), ammonium nitrate (8 kg), gypsum (18 kg);
- manure (2000 kg), mixed with straw (50 kg), urea (5 kg), ammonium sulfate (8 kg), superphosphate (5 kg), chalk (7.5 kg);
- manure (75–80%), combined with winter wheat or rye straw (20–25%).
To make the substrate, you must follow the following instructions:
- Lay a plastic film on the ground to prevent pests from entering.
- Place the straw in warm water for 24 hours.
- Place it in piles, mixing with manure, making 6–8 layers.
- Water each layer with warm water.
- After 3–4 days, mix and add urea with superphosphate.
- After 3-4 days, mix by adding the next 2 ingredients.
- Repeat the previous procedure 4-5 times.
- During the last mixing, add gypsum.
Compost is considered ready when the ammonia smell disappears from it and it turns light brown.
On average, the duration of its preparation is 26–28 days. The temperature of the substrate for sowing mushrooms should be up to +25°C. The finished compost should be distributed into boxes or containers in which the mycelium will be germinated, 25–30 cm high. Then you need to make holes in it 5 cm deep. A distance of 20 cm should be maintained between the depressions. It is recommended to place them in a checkerboard pattern. A small amount of mycelium should be placed in the holes. For 1 m² of substrate, 500 g of compost and 350–400 g of grain mycelium are required.
During incubation, air humidity must be maintained at 70–95%. This can be achieved by covering the containers with paper or burlap, which need to be moistened periodically. Active growth of mycelium can be observed from the 10th to 12th day after sowing. At this time, an earthen layer 3–4 cm high should be laid on the compost. The earth should consist of the following components:
- peat (5 parts);
- limestone (1);
- garden soil (4).
Another option for the covering substrate: chalk (1 part), garden soil (4), peat (9). 40–50 kg of soil is usually needed per 1 m². As the substrate dries, it is necessary to moisten it with warm water. If you need to increase the humidity in the room where mushrooms grow, then spraying is necessary. To reduce this parameter, ventilation is needed.
Find out also the recipe for fried champignons with onions.
When the incubation period ends, it is necessary to change the temperature regime, lowering the temperature to +12...+17°C, or move the containers to a pre-prepared room for the development of mushrooms. The first harvest should appear after 3–4 months. Harvesting is done not by cutting, but by twisting, since when pruning, pathogenic organisms can penetrate into the soil.
As a rule, maximum yield is observed during the first three fruitings. In total, you can collect from 5 to 8 harvests. The duration of fruiting is 8–14 weeks. From 1 m² on average you can get 5–12 kg.
How to make agar for mycelium at home in another way
The estimated yield of the substance is 1 liter.
Ingredients:
- 284 g potatoes,
- 21.3 g (3/4 oz) agar,
- 8 g dextrose (you can use table sugar instead).
Work process.
Step 1. To make agar for mycelium with your own hands, you need to wash the potatoes and cut them into small pieces, leaving the skins, and then boil them in 0.5 liters of water until fully cooked. Remove potatoes and their scraps. Pour 1 liter of water into an iron or glass bowl and add dextrose (sugar), decoction and agar.
Step 2. Dissolve the agar. To do this, place the resulting agar mixture in a container covered with aluminum foil in a pressure cooker. Heat the pressure cooker to 121°C (1 atm) and leave. After 20 minutes, the agar will completely dissolve. Then turn off the stove and allow the pressure cooker to cool slowly.
Step 3. Using kitchen mittens or a towel, pour the mixture with dissolved agar to a third of the volume into test tubes (or small bottles). Place the test tubes on a stand or in cans. Pour the remaining agar into a bottle, close it with a cotton or synthetic pad and sterilize later, along with the rest of the test tubes.
Do not close the tube caps or caps tightly. In this case, the pressure will be equalized during sterilization. If cotton or synthetic tampons are used for closing, you do not have to worry about equalizing the pressure, however, additionally, the test tubes should be covered with aluminum foil, otherwise condensation from the cooling pressure cooker will fall on the plugs.
Step 4. Sterilize the agar, for which place the test tubes (bottles) with it in a pressure cooker and maintain at a temperature of 121 ° C (1 atm.) for 25 minutes, not including the time spent on achieving the required pressure. Then turn off the stove and leave the dishes to cool slowly. The pressure should not be reduced quickly, as this may cause the agar in the tubes to boil and splash out through the swabs and stopper caps, which is likely to lead to contamination.
Step 5. At the final stage, the mixture in the test tubes acquires an inclined position. To do this, wipe the surface on which the test tubes will be located with a 10% solution of bleach containing chlorine. There should be no drafts in the room.
Using kitchen mittens or a towel, remove the hot test tubes from the pressure cooker and place them on the table in an inclined position, leaning the container with one end against some object. Before this, it is advisable to select the correct angle of inclination using some foreign objects (bars, a stack of magazines, etc.)
When the agar begins to harden, turning into jelly, close the caps (stoppers) in the test tubes more tightly.
Potato agar in test tubes is stored in a cool, dust-free place.
Watch the video on how you can make agar for mycelium with your own hands:
The final section of the article is devoted to how to properly grow mushroom mycelium.