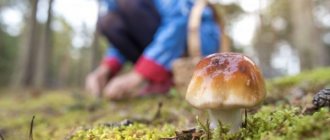
After a good rain, a lot of mushrooms appear in the forest. In autumn, picking mushrooms in the forest is a fascinating activity for both children and adults. Not everyone can spot where they grow, but knowledgeable mushroom pickers can easily find them. It is important not to confuse edible mushrooms with poisonous and dangerous mushrooms.
Many art lovers go to the forest to sketch mushrooms from life. But not everyone has this opportunity.
This article describes in detail how to draw poisonous mushrooms and different types of edible mushrooms without any special training.
How to draw a mushroom step by step
In nature, mushrooms are divided into edible and non-edible types. Among the poisonous representatives, everyone knows the fly agaric. This also includes the pale toadstool and false honey mushrooms.
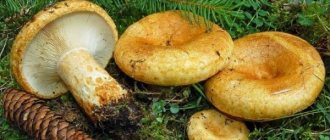
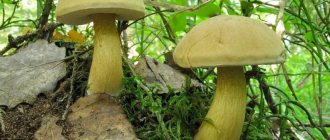
Edible species include: white boletus, boletus, aspen mushroom, chanterelle, oyster mushroom, boletus and many other representatives.
All of them are very tasty and are valued by mushroom pickers. Art lovers often spend time in the forest to convey the natural beauty of these forest inhabitants. This article tells you how to draw the most popular species without special training or skills.
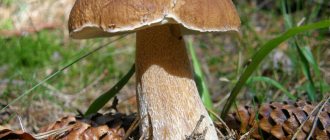
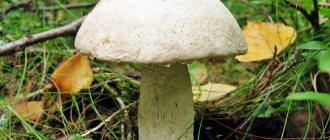
White King
Let's start with the simplest and most popular option. You can draw with your child. To do this, you should prepare: simple and multi-colored pencils, plastic.
- We draw the contours of the mushroom. We make the head semicircular, and add an elongated oval at the bottom. This is a leg.
- Next we draw the same one, only smaller in size. We are engaged in drawing contours and details. At the bottom of the cap we draw an arc separating its top. The line indicates the location of the beginning of the leg.
- Make the contours of the small mushroom clearer. We remove all auxiliary dashes. For a beautiful look, add grass. It may slightly overlap the main part.
- Now you can start coloring. The tops will be brown. Show a little light highlight. We make the base gray and the grass green. Paint the bottom of the cap with pale yellow paint. The drawing is ready.
Tips from the artist
Drawing mushrooms is not as easy as it seems at first glance. Therefore, when choosing an appropriate object, beginners should listen to the following tips:
- To draw a wild mushroom, it is recommended to hold the sheet or canvas in a vertical position;
- So that sketches with a simple pencil are not complicated, the position of the sheet can be changed;
- When using different colors, it is necessary to mix them to obtain shades, and then apply the latter to the base, starting from the lightest to the darkest;
- To maintain the angle of inclination of the mushroom while sketching it, you need to tilt the pencil in the air according to the location of the thematic object, then apply the tilted tool to the sheet or canvas and trace;
- Growing mushrooms have to be drawn from a close perspective, so their caps can be supplemented with different focal points of attraction - a bug, a frog, a snail;
- The grass at the foot of the mushroom looks more impressive together with fallen leaves.
Still life is considered to be the best representation of mushrooms. However, painting lots of foxes reveals a beautiful forest background.
In any case, on the eve of the execution of complex plots, you will have to draw a lot of sketches and more.
How to draw a fox?
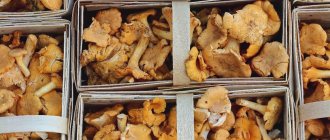
Chanterelles are different in appearance from most other mushrooms. It may be yellow or orange. They have an irregular shape: the edges are wavy, curved towards the bottom. The cap is almost completely fused with the stem. Such mushrooms grow in almost every forest. More often found near oak, birch or pine.
Having learned a few distinctive features, you can begin to depict it on paper in stages.
- We make the outline of the mushroom. To make it beautiful, you need to draw two auxiliary lines: one horizontal, the second vertical, slightly tilted to the side.
- We add two slashes to the vertical line. This will be the base of the leg. Now we draw two lines up, gradually expanding them. The result is a shape similar to a cup.
- To give the top its own shape, draw an elongated and uneven oval. It should protrude slightly to the sides.
- We remove all auxiliary lines. Under the cap we draw, a little with a slight slope, a lot of vertical stripes. Draw the grass using sharp triangles.
- All that remains is to color everything. We outline the outline in brown, lightly shading the mushroom itself. Make the sides more saturated. Add orange to the top of the leg. The grass is green. This is how easy it is to draw a fox with a pencil, following a step-by-step plan.
Features of pencil drawing
Drawing a mushroom with a pencil is not a difficult task if you follow the detailed instructions and follow the steps indicated step by step.
Drawing materials
Before you start drawing, you need to stock up on stationery.
To create a drawing you will need:
- Paper: regular landscape sheet or whatman paper of any format;
- Simple pencil;
- Colour pencils;
- Eraser;
- Black liner - for outlining the outline of the drawing.
Basic stages of pencil drawing
After preparing the necessary materials, you can start drawing.
There is a certain step-by-step diagram that is used when drawing all types of mushrooms:
- Vertical and horizontal lines are drawn on a sheet of paper, thereby determining where the stem and cap of the future mushroom will be located.
- On a vertical line, a mushroom stem is schematically drawn in the form of a thin oblong rectangle.
- Next, on top of the rectangle, using a horizontal line, draw half a circle - the future hat.
- The next stage is a detailed drawing of the base and cap. It is important to understand that their shape and size depend on the type of mushroom depicted. The stem of the porcini mushroom will be thick, and that of honey mushrooms will be thin.
- Using an eraser, remove unnecessary strokes and lines.
- The finished mushroom is outlined along the contour with a black liner and, if desired, decorated with colored pencils.
To make the picture more realistic, draw the shadow of the mushroom or add surroundings to it. It could be moss or an autumn forest.
fly agaric
This is the leader of the inedible mushrooms. Despite its beautiful coloring, it is strictly forbidden to eat. To draw it, you need to choose only bright shades of pencils. It is better to use watercolors. Additionally, you will need a black gel pen and an eraser. Let's get to work. We will depict a family of three representatives of the species.
- We draw three contours of future legs. The tallest one should be in the center.
- Adding hats. Fly agarics of different sizes have different shapes. For the central one, we make a circle with wavy edges at both the top and bottom. For the left mushroom, draw a circle and add an arc on top, dividing the entire cap into two parts. The top half is much smaller than the bottom. For the right one - a small elongated oval.
- Adding details. It is necessary to show folds on the legs: some in the center, others in several rows at the bottom. Add plates under the mushroom caps.
- We draw white dots on the head using circles of different sizes. Moss can be depicted below. Now everything needs to be outlined with a black pen. After it dries, remove all pencil lines.
- Let's color the picture. We make the legs gray. The cap plates are the same color. We use brown to show shadows. The hat consists of three layers of color. The top is orange. The edges are burgundy and the central part is red. We correct everything with smooth transitions. Paint the moss with a dark green shade. The work is completed.
Detailed algorithm of actions
The first stage involves drawing the structure of the mushroom, and the main component of the natural find from the forest is the stem. But a common mistake made by beginning artists can be safely called the absence of a contour indicating the ground, from which it is easier to start in the process of creating an effective picture.
The caps are initially created schematically; visually in future plants you can recognize hammers of different sizes, but then the top will take on a more appropriate appearance.
In order for the sketch to take a realistic shape, the blanks are drawn in accordance with the type of cap, and the excess stripes are erased with an eraser. Three plants can fit on one piece of paper; if you wish, you should try to draw a diagram of the structure of a mushroom of this type:
It is better to start creating the upper part from the bottom, and then determine the overall height of each element in the picture. For greater realism, the ground is decorated with blades of grass, and a small leaf is placed on one of the plants; you need to strive for maximum effectiveness of the image as a whole.
Before painting a picture of a mushroom with paint, it is worth going over the main strokes with a liner, then the outline will be clearly visible and the presence of errors during coloring will be minimized. After that, all remnants of a simple pencil should be completely removed using an eraser.
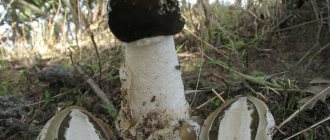
boletus
This mushroom has a high, curved stalk. The hat is thick and red. They have a spongy layer underneath. It won’t be difficult even for a child to draw it. Here is a small easy master class.
1 step. Let's draw a hat. To do this, draw a horizontal line. Its length is the width of the cap. From the ends of the line at the top, draw an arc.
Step 2. We depict the leg in the form of an elongated vertical oval. That's the whole lesson. All that remains is to paint.
Step 3. The hat can be dark brown or gray. The bottom layer is white. The pattern on the leg resembles birch bark. Everyone can imagine this tree and repeat a similar drawing, only in a smaller form.
What you will need
In order to draw a mushroom we may need:
- Paper. It is better to take medium-grain special paper: beginning artists will find it much more pleasant to draw on this kind of paper.
- Sharpened pencils. I advise you to take several degrees of hardness, each should be used for different purposes.
- Eraser.
- Stick for rubbing hatching. You can use plain paper rolled into a cone. It will be easy for her to rub the shading, turning it into a monotonous color.
- A little patience.
- Good mood.
Honey mushroom family
Small mushrooms with round caps are always arranged in groups. They grow on green meadows and stumps. Every mushroom picker loves these fragrant babies. When starting to depict these beauties, it is better to look at them in person. After all, it is so unusual for them to gather in friendly companies. But, if this is not possible, you can look at the photo and make our step-by-step lesson.
- Let's draw a cylinder - this is the future stump. We mark the location of the mushrooms with thin lines. Two will be at the bottom left, and a group of five will be at the top right on the edge of the stump.
- We thicken the legs. We draw semi-oval caps.
- Now we color the work with colored felt-tip pens. The mushrooms themselves will be light brown. Don't forget to show the skirt under the hat and on the leg. The stump is dark brown in color. The top of the cut is yellow.
- We add a little yellow to the mushroom itself, showing the transition from dark to light areas. We darken the bottom of the stem of each honey mushroom.
- Draw the roots of the stump and the grass.
You can make a drawing unique by adding just a little bit of your vision. Even following our general step-by-step master classes, each person’s paintings will be different. And that's great. After all, every video world is different.
Symptoms and signs of poisoning
Poisoning with toadstool is dangerous because signs of toxic substances entering the body do not appear immediately. The first symptoms of poisoning may appear only after 30-40 hours.
The first symptoms of poisoning are acute pain in the stomach and intestines, upset stool, and vomiting. Diarrhea and vomiting are so frequent that they cannot be stopped with medications. Diarrhea is watery, yellow-green in color.
After 2-3 days, symptoms of poisoning may disappear, as if the toxic mushroom had not been consumed. However, the consequences of poison entering the body quickly make themselves felt. Within a day, the pain resumes, vomiting and diarrhea occur again.
The effect of poison on the human body
There are several stages of the action of a toxic fungus on the human body:
- Latent period. Lasts up to two days. At this time there are no signs of poisoning. However, during this time, toxic substances manage to penetrate the blood and begin their destructive effect on internal organs. This time is also called the incubation period.
- Manifestation of symptoms. The fact that the body is affected by a toxic toxic substance is signaled by acute pain, frequent vomiting and diarrhea, since the poison causes inflammation of the mucous membrane of the stomach and small intestine. This period is also characterized by severe dehydration of the body, against the background of which blood pressure decreases. The patient feels severe weakness and dizziness. During this period, convulsions and loss of consciousness often occur. Symptoms of intoxication appear within 1-2 days.
- Imaginary calm. For a short time, all signs of intoxication disappear. The patient thinks that he is getting better, but this is only an appearance. This stage of poisoning is dangerous because if a large amount of a toxic substance enters the body, sudden death can occur. The stage of imaginary calm lasts no more than 12 hours.
- Damage to parenchymal organs. Toxins have a destructive effect on the liver, so during this period severe pain appears in the right side. The symptoms are similar to those of kidney failure. This stage is characterized by the presence of yellowness of the skin, mucous membranes of the mouth and eyes.
The lethal dose for an adult is a third of a mushroom cap. If this amount of poison enters the body, then death occurs as a result of acute heart failure and deep damage to the kidneys and liver. Death can occur within a week, and in the absence of timely treatment, already in the first day. But if the patient received medical care on time, then after a few weeks the signs of intoxication disappear without a trace, and the internal organs affected by toxins are completely restored.
How to draw a mushroom step by step with a pencil - interesting master classes for beginners
In nature, mushrooms are divided into edible and non-edible types. Among the poisonous representatives, everyone knows the fly agaric. This also includes the pale toadstool and false honey mushrooms. Edible species include: white boletus, boletus, aspen mushroom, chanterelle, oyster mushroom, boletus and many other representatives.
All of them are very tasty and are valued by mushroom pickers. Art lovers often spend time in the forest to convey the natural beauty of these forest inhabitants. This article tells you how to draw the most popular species without special training or skills.
Foliotina wrinkled
In nature, these mushrooms are most often found in the northwestern part of America. These macromycetes are very similar to psilocybin, which is used for healing infusions. But unlike it, Foliotina rugosa is very dangerous for humans. The fact is that this mushroom is very toxic.
White King
Let's start with the simplest and most popular option. You can draw with your child. To do this, you should prepare: simple and multi-colored pencils, plastic.
- We draw the contours of the mushroom. We make the head semicircular, and add an elongated oval at the bottom. This is a leg.
- Next we draw the same one, only smaller in size. We are engaged in drawing contours and details. At the bottom of the cap we draw an arc separating its top. The line indicates the location of the beginning of the leg.
- Make the contours of the small mushroom clearer. We remove all auxiliary dashes. For a beautiful look, add grass. It may slightly overlap the main part.
- Now you can start coloring. The tops will be brown. Show a little light highlight. We make the base gray and the grass green. Paint the bottom of the cap with pale yellow paint. The drawing is ready.
How to draw a fox?
Chanterelles are different in appearance from most other mushrooms. It may be yellow or orange. They have an irregular shape: the edges are wavy, curved towards the bottom. The cap is almost completely fused with the stem. Such mushrooms grow in almost every forest. More often found near oak, birch or pine. Having learned a few distinctive features, you can begin to depict it on paper in stages.
- We make the outline of the mushroom. To make it beautiful, you need to draw two auxiliary lines: one horizontal, the second vertical, slightly tilted to the side.
- We add two slashes to the vertical line. This will be the base of the leg. Now we draw two lines up, gradually expanding them. The result is a shape similar to a cup.
- To give the top its own shape, draw an elongated and uneven oval. It should protrude slightly to the sides.
- We remove all auxiliary lines. Under the cap we draw, a little with a slight slope, a lot of vertical stripes. Draw the grass using sharp triangles.
- All that remains is to color everything. We outline the outline in brown, lightly shading the mushroom itself. Make the sides more saturated. Add orange to the top of the leg. The grass is green. This is how easy it is to draw a fox with a pencil, following a step-by-step plan.
First aid for poisoning
In the event of poisoning by toadstool, it is important to quickly provide assistance to the victim, because a favorable outcome of treatment depends on this. If symptoms of intoxication appear in the first hours after eating mushrooms, you should immediately rinse your stomach. To do this, the patient drinks at least a liter of warm water and induces vomiting. The procedure should be repeated 5-6 times. However, gastric lavage at home may not have the desired effect if 6 hours have passed since the poison entered the body, since during this time the toxic substances have time to enter the blood.
At the same time as providing first aid, it is necessary to call a medical team. In the hospital, the patient's stomach is washed out using a tube, which is much more effective than a home procedure. The doctor prescribes the necessary sorbents and laxatives. However, they can also be taken at home when the first signs of intoxication appear. The most suitable laxative is magnesium sulfate. Effective sorbents are preparations based on milk thistle, Activated carbon, Smecta, Polysorb.
fly agaric
This is the leader of the inedible mushrooms. Despite its beautiful coloring, it is strictly forbidden to eat. To draw it, you need to choose only bright shades of pencils. It is better to use watercolors. Additionally, you will need a black gel pen and an eraser. Let's get to work. We will depict a family of three representatives of the species.
We draw three contours of future legs. The tallest one should be in the center.
- Adding hats. Fly agarics of different sizes have different shapes. For the central one, we make a circle with wavy edges at both the top and bottom. For the left mushroom, draw a circle and add an arc on top, dividing the entire cap into two parts. The top half is much smaller than the bottom. For the right one - a small elongated oval.
- Adding details. It is necessary to show folds on the legs: some in the center, others in several rows at the bottom. Add plates under the mushroom caps.
- We draw white dots on the head using circles of different sizes. Moss can be depicted below. Now everything needs to be outlined with a black pen. After it dries, remove all pencil lines.
- Let's color the picture. We make the legs gray. The cap plates are the same color. We use brown to show shadows. The hat consists of three layers of color. The top is orange. The edges are burgundy and the central part is red. We correct everything with smooth transitions. Paint the moss with a dark green shade. The work is completed.
Patouillard fiberglass
Eating this mushroom can cause severe muscarinic poisoning with a fatal outcome. There is even more muscarine in Patouillard Fiber than in red fly agaric, and several times more. The first manifestations of poisoning by this mushroom appear in the victim approximately 30 minutes - 2 hours after consuming Patouillard Fiber.
boletus
This mushroom has a high, curved stalk. The hat is thick and red. They have a spongy layer underneath. It won’t be difficult even for a child to draw it. Here is a small easy master class.
- 1 step. Let's draw a hat. To do this, draw a horizontal line. Its length is the width of the cap. From the ends of the line at the top, draw an arc.
- Step 2. We depict the leg in the form of an elongated vertical oval. That's the whole lesson. All that remains is to paint.
- Step 3. The hat can be dark brown or gray. The bottom layer is white. The pattern on the leg resembles birch bark. Everyone can imagine this tree and repeat a similar drawing, only in a smaller form.
Honey mushroom family
Small mushrooms with round caps are always arranged in groups. They grow on green meadows and stumps. Every mushroom picker loves these fragrant babies. When starting to depict these beauties, it is better to look at them in person. After all, it is so unusual for them to gather in friendly companies. But, if this is not possible, you can look at the photo and make our step-by-step lesson.
- Let's draw a cylinder - this is the future stump. We mark the location of the mushrooms with thin lines. Two will be at the bottom left, and a group of five will be at the top right on the edge of the stump.
- We thicken the legs. We draw semi-oval caps.
- Now we color the work with colored felt-tip pens. The mushrooms themselves will be light brown. Don't forget to show the skirt under the hat and on the leg. The stump is dark brown in color. The top of the cut is yellow.
- We add a little yellow to the mushroom itself, showing the transition from dark to light areas. We darken the bottom of the stem of each honey mushroom.
- Draw the roots of the stump and the grass.
- You can make a drawing unique by adding just a little bit of your vision. Even following our general step-by-step master classes, each person’s paintings will be different. And that's great. After all, every video world is different.
List of accessories
Before you understand all the small details of how to draw a mushroom step by step, you need to purchase or get on the table all the components for working on the picture. The list of accessories includes:
It is best to sketch out a template for further application of various shades with a simple pencil, because any unnecessary nuances can later be easily removed with an eraser. You should take a sheet of paper based on the future landscape; you need to take into account the number of elements and their sizes.
After all the work is completed, it will not be superfluous to draw the outline with a liner, then the landscape will become more expressive, and all the lines will be as noticeable as possible.
The final touch is the application of various colors, for this you will need pencils or paints, you can choose at your discretion, but do not forget about the thickness of the paper; for some manipulations a more rigid structure will be required.